How to Clip a Dog’s Nails: Expert Tips for Healthy Paws
Let’s be honest—nail clipping day isn’t exactly the highlight of your dog’s week. Your furry friend might give you those pleading eyes, do the classic “nail trim shuffle,” or suddenly develop selective hearing when you pull out the clippers. But here’s the thing: keeping your dog’s nails trimmed isn’t just about avoiding those accidental scratches on your hardwood floors (though that’s a nice bonus). Regular nail maintenance is crucial for your pup’s overall health, comfort, and mobility.
Long nails can cause serious problems for your four-legged companion. They can alter your dog’s gait, lead to joint pain, and even cause infections if they break or split. Plus, overgrown nails make it harder for your dog to grip surfaces, which affects their balance and confidence during playtime. The good news? Learning how to clip a dog’s nails properly is totally doable, and with the right techniques and a little patience, you and your pup can make it through the process without drama.
In this comprehensive guide, we’re breaking down everything you need to know about dog nail care—from choosing the right tools to mastering the perfect technique. Whether you’re a first-timer or looking to refine your skills, we’ve got you covered.
Why Regular Nail Trimming Matters
Your dog’s nails are constantly growing, just like yours. Without regular trimming, they can become overgrown and cause a cascade of problems. According to the American Kennel Club, overgrown nails are a serious health concern that affects your dog’s quality of life.
When nails get too long, they can curl and dig into your dog’s paw pads, causing pain and potential infections. This discomfort changes how your dog walks, which puts strain on their joints, ligaments, and bones. Over time, this unnatural gait can lead to chronic pain, arthritis, and mobility issues. Additionally, long nails are more prone to splitting, cracking, or tearing—injuries that can be painful and require veterinary attention.
Most veterinarians recommend trimming your dog’s nails every 3-4 weeks, though some active dogs who spend lots of time on pavement might naturally wear down their nails faster. The general rule of thumb? If you hear your dog’s nails clicking on the floor when they walk, it’s time for a trim.
Choosing the Right Tools
Not all nail clippers are created equal. Using the right tool makes the job easier, safer, and more comfortable for your dog. Here are your main options:
- Guillotine Clippers: These have a circular opening where you insert the nail, and a blade slides across to cut. They’re great for small to medium dogs with thin nails and offer good control. Many owners find them intuitive and easy to use.
- Scissor Clippers: These look like scissors and work by squeezing handles together. They’re excellent for larger dogs with thicker nails and give you more leverage. They also work well if you prefer a familiar cutting motion.
- Grinder Tools: Electric nail grinders sand down the nail rather than cutting it. They’re fantastic for dogs who are sensitive to the pressure of clipping, and they reduce the risk of splitting. However, they can be louder and take longer.
Whichever tool you choose, make sure it’s sharp. Dull clippers crush the nail instead of cleanly cutting it, which causes pain and can lead to nail damage. Quality matters here—invest in a good pair from a reputable brand.
You’ll also want to have styptic powder on hand. This magical stuff stops bleeding if you accidentally clip into the quick (the pink part of the nail containing blood vessels). It’s a lifesaver and helps you stay calm if a little mishap happens.
Preparing Your Dog for Success
The secret to stress-free nail trimming starts long before you pick up the clippers. Preparation and positive association are your best friends.
Get Your Dog Comfortable with Their Paws: Start handling your dog’s paws regularly during calm moments. Touch their feet, massage them, spread their toes, and make it a positive experience with treats and praise. This desensitization is crucial and makes the actual clipping process much smoother.
Introduce the Tools Gradually: Let your dog see and sniff the clippers or grinder. Don’t use them right away—just let them get familiar with the tools. You can even click the clippers near them a few times so they get used to the sound without the stress of actual trimming.
Choose the Right Time: Pick a moment when your dog is calm and relaxed—not after playtime when they’re wound up or when they’re already anxious. Some dogs do better in the evening when they’re naturally more mellow.
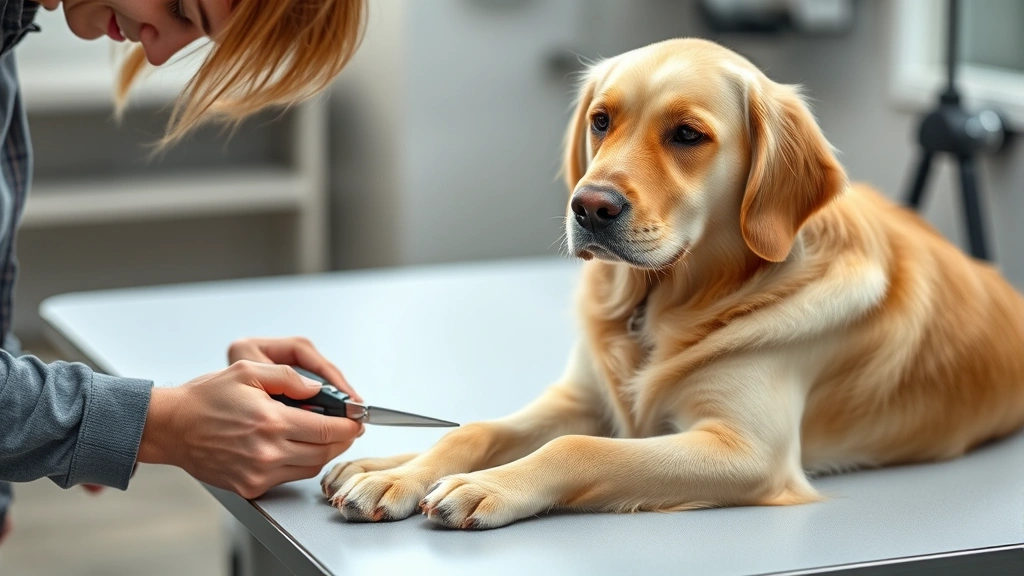
Set Up Your Space: Find a well-lit area where you can work comfortably. Good lighting helps you see the nail clearly and avoid mistakes. Consider having someone help you hold your dog steady, or use a grooming table if you have one.
Use High-Value Treats: Have special treats ready—the kind your dog absolutely loves and only gets during nail trimming. This creates a positive association and gives them something to focus on besides the clippers.
Step-by-Step Clipping Technique
Now for the moment of truth. Here’s how to properly clip your dog’s nails:
- Position Your Dog: Have your dog sit or lie down in a comfortable position. You want easy access to their paws without them feeling trapped or stressed. Keep the atmosphere calm and relaxed.
- Examine the Nail: Look at the nail closely. You’re looking for the quick—the pink or darker area inside the nail that contains blood vessels. On light-colored nails, you can usually see it clearly. This is where things get tricky with darker nails, which we’ll address separately.
- Identify the Cutting Point: You want to cut about 2-3mm in front of the quick. If you’re unsure, it’s better to cut less—you can always trim more, but you can’t undo cutting into the quick. Look for a small black or dark dot in the center of the nail’s cross-section when viewed from the bottom—that’s the beginning of the quick.
- Position the Clippers: Hold the clippers perpendicular to the nail, not at an angle. This ensures a clean cut rather than a crush or split. The blade should be positioned at that safe distance from the quick.
- Make the Cut: Use a quick, confident motion. Hesitation can cause you to apply uneven pressure, which might crush the nail. One smooth squeeze or cut is better than sawing motions.
- Check All Four Paws: Don’t forget the back paws! They often get overlooked but need trimming just as much. Also check for dewclaws (those small nails on the inside of the front legs), which don’t touch the ground and can grow unchecked.
- Reward Immediately: Give your dog praise and treats right after each nail. This reinforces the positive association and makes them more cooperative next time.
The entire process should be calm and methodical. Rushing leads to mistakes, so take your time and stay patient.

Tackling Those Tricky Black Nails
Black or dark nails are notoriously challenging because you can’t see the quick inside. This is why many owners find how to cut dogs black toenails intimidating. But don’t worry—there are proven strategies.
The safest approach is the “dot method.” Look at the bottom (underside) of the nail. You’ll see a small black or dark circle in the center surrounded by a lighter ring. That dark circle is the beginning of the quick. Start cutting from the side until you see that dark dot appear in the center of the cut surface—stop immediately. You’ve reached the quick, and you know exactly how much further you can safely trim.
If you’re nervous about this method, consider using a guide for trimming black dog nails or investing in a nail grinder instead. Grinders are particularly useful for dark nails because you have more control and can gradually sand down the nail while monitoring your progress.
Some owners use a nail light—a small LED light designed to shine through the nail and reveal the quick inside. These can be helpful, though they take some practice to use effectively.
Remember, it’s always better to trim too little than too much. You can schedule another trim session sooner if needed, but you can’t undo cutting into the quick.
Safety Tips and Common Mistakes
Let’s talk about what not to do. These safety tips will help you avoid common pitfalls:
Never Cut at an Angle: Angled cuts crush the nail and cause splitting. Always cut perpendicular to the nail. Think of it like cutting a piece of chalk straight across, not at a slant.
Don’t Ignore Signs of Infection: If your dog’s nail area becomes red, swollen, or discharge appears, contact your vet. These are signs of infection that need professional treatment.
Avoid Rushing: Hurrying is how accidents happen. Take your time, especially when you’re learning. One nail every couple of minutes is perfectly fine.
Don’t Use Dull Tools: Dull clippers are dangerous because they require more pressure, which can slip or cause crushing. Keep your tools sharp or replace them regularly.
Stop if Your Dog is Extremely Stressed: If your dog is panicking or thrashing, stop and try again another day. A stressed, struggling dog is more likely to get hurt. Building positive associations is more important than completing all nails in one session.
Have Stypic Powder Ready: Even experienced groomers occasionally nick the quick. Having styptic powder on hand means you’re prepared. Apply it directly to the bleeding nail and hold pressure for a few seconds.
Post-Trim Care and Maintenance
After you’ve finished trimming, your dog’s paw care isn’t quite done. Proper aftercare keeps nails healthy and prevents issues between trims.
Check the nails daily for any signs of problems—cracks, splits, or discoloration. If you notice anything concerning, contact your veterinarian. Between trims, you can help naturally maintain nail length by ensuring your dog gets plenty of exercise on hard surfaces like concrete or asphalt, which naturally wears down nails.
As part of your overall grooming routine, remember that nail care is just one piece of the puzzle. Learning how to groom a dog comprehensively will help you understand how nail care fits into your dog’s broader health and hygiene needs. Additionally, keeping your dog’s paws clean is important—you might want to explore how to clean dogs ears and other grooming fundamentals to build a complete home care routine.
For a full grooming experience, don’t forget about bathing. Knowing how to bathe a dog properly will complement your nail care routine and keep your pup looking and feeling their best.
Keep a trim schedule—mark your calendar every 3-4 weeks as a reminder. Consistency prevents nails from getting overgrown and makes each trimming session quicker and easier. Some owners find it helpful to establish nail trimming as part of their regular grooming day, perhaps alongside other tasks.
When to Call a Professional Groomer
There’s absolutely no shame in taking your dog to a professional groomer for nail trimming. In fact, many dog owners prefer this option, and there are several good reasons why:
- Professional Experience: Groomers trim nails dozens of times daily and have developed excellent technique and judgment. They can handle nervous or difficult dogs with ease.
- Specialized Tools: Professional groomers often have high-quality tools and grinders that produce better results than home equipment.
- Less Stress: Some dogs genuinely do better with a professional. If your dog is extremely anxious or has had a bad experience with nail trimming, a groomer can help rebuild their confidence.
- Problem Identification: Groomers often spot nail or paw issues that owners miss, catching problems early.
- Time-Saving: If you’re busy or uncomfortable doing it yourself, a groomer takes the task off your plate entirely.
Professional grooming typically costs $10-30 per visit depending on your location and your dog’s size. Many groomers offer packages that include nail trimming along with bathing and other grooming services.
The ASPCA provides guidance on professional grooming services and what to expect when working with groomers. If you do choose professional grooming, it’s still valuable to learn the basics yourself for maintenance between appointments.
Frequently Asked Questions
How often should I trim my dog’s nails?
Most dogs need nail trimming every 3-4 weeks. However, this varies based on your dog’s lifestyle. Dogs who spend lots of time on hard surfaces naturally wear down their nails faster and might only need trimming every 6-8 weeks. Conversely, dogs who spend most time indoors or on soft surfaces might need trimming every 2-3 weeks. The best indicator is listening for clicking sounds when your dog walks on hard floors—that’s your cue it’s time for a trim.
What do I do if I accidentally cut the quick?
Stay calm! It happens to everyone. First, apply styptic powder directly to the bleeding nail and hold gentle pressure for 30-60 seconds. If you don’t have styptic powder, you can use cornstarch or even flour as a temporary substitute (though styptic powder is more effective). Once the bleeding stops, monitor the nail for signs of infection over the next few days. Contact your vet if the area becomes red, swollen, or shows discharge. Most minor quick nicks heal without problems.
Why does my dog’s nail keep splitting?
Splitting nails usually indicate either they’re too long or you’re using dull clippers that crush rather than cut cleanly. Ensure your clippers are sharp and that you’re trimming regularly. If splitting persists even with proper trimming, it could indicate a nutritional deficiency or health issue—consult your veterinarian. Some dogs are also naturally more prone to brittle nails, which might benefit from supplements recommended by your vet.
Can I use human nail clippers on my dog?
Not recommended. Human nail clippers aren’t designed for the thickness and shape of dog nails. Using them often results in crushing rather than clean cuts, which causes pain and splitting. Invest in proper dog nail clippers—they’re inexpensive and make a huge difference in quality and safety.
Is it normal for my dog to bleed a little after nail trimming?
A small amount of bleeding might occur if you trimmed very close to the quick, but it shouldn’t be excessive. If there’s just a tiny amount of blood, it’s usually not a concern. However, if bleeding is heavy or continues for more than a minute after applying styptic powder, contact your vet. Excessive bleeding could indicate a clotting disorder or other health issue.
My dog is extremely anxious about nail trimming. What can I do?
Start with desensitization—handle their paws regularly without any trimming involved. Introduce the tools gradually and pair everything with high-value treats. You might also consider using a grinder instead of clippers, as some dogs find it less stressful. If anxiety is severe, talk to your vet about whether anti-anxiety medication might help during the process. Professional groomers can also be wonderful for anxious dogs.
Should I trim my dog’s nails before or after a bath?
Either time works, though many groomers prefer trimming before bathing. Wet nails are softer and more prone to splitting. If you do bathe your dog and want to trim nails, wait until they’re completely dry. Some owners find their dog is calmer after a bath, so if that works for your pup, go for it—just make sure nails are dry first.
What about dewclaws?
Dewclaws are the small nails on the inside of the front legs (some dogs also have them on back legs). These don’t touch the ground, so they don’t naturally wear down. They grow in a tighter circle and can actually curl into the paw pad if left untrimmed, causing pain and injury. Always include dewclaws in your trimming routine—they often need more frequent attention than regular nails.
Can I trim my dog’s nails if they have arthritis or mobility issues?
Absolutely, and it’s even more important for these dogs since overgrown nails exacerbate joint problems. However, be extra gentle and patient. You might need help holding your dog in a comfortable position. Consider using a grinder instead of clippers, as it requires less pressure and positioning. If your dog has severe mobility issues, professional grooming becomes even more valuable.
How can I tell if my dog’s nails are the right length?
Properly trimmed nails should just barely touch the ground when your dog stands. You shouldn’t hear clicking sounds during normal walking. The nails should be short enough that you can’t see them extending beyond the paw pad when looking at your dog’s foot from above. If you’re unsure, your vet or groomer can show you the ideal length for your specific dog.