How to Draw a Dog Paw: Step-by-Step Guide
Whether you’re an aspiring artist, a devoted dog lover, or someone looking to create custom pet artwork, learning how to draw a dog paw is an essential skill that opens up a world of creative possibilities. Dog paws are iconic symbols of our furry friends, appearing everywhere from greeting cards to tattoo designs, and mastering their anatomy will elevate your drawing abilities significantly.
The beauty of drawing dog paws lies in their deceptive simplicity. At first glance, they might seem straightforward—just a few circles and lines—but capturing the true character, texture, and three-dimensional quality of a real paw requires understanding the underlying structure. Whether you’re sketching a gentle paw reaching out for a handshake or a powerful paw mid-stride, this comprehensive guide will walk you through every step of the process.
In this guide, we’ll explore the anatomical foundations of canine paws, break down the drawing process into manageable steps, and provide you with professional tips to make your paw drawings look realistic and engaging. By the end, you’ll have the confidence to draw paws from any angle and in any pose.
Understanding Canine Paw Anatomy
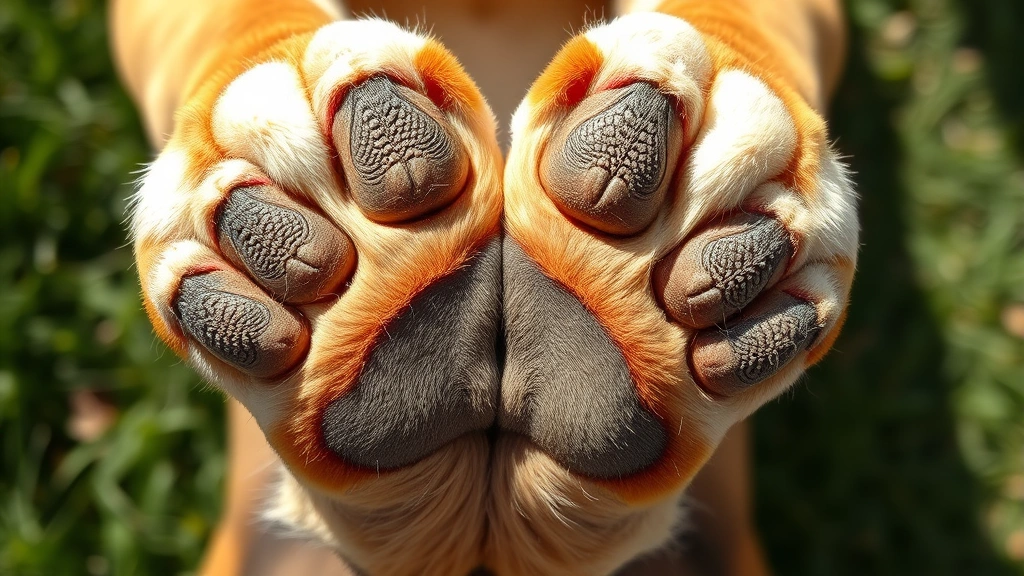
Before you put pencil to paper, it’s crucial to understand the actual structure of a dog’s paw. Dogs have four toes on their back paws and five on their front paws, with the fifth toe (called the dewclaw) only appearing on the front legs. This anatomical knowledge will be the foundation of your accurate drawings.
A dog’s paw consists of several key components: the digital pads (the small toe pads), the metacarpal pad (the larger central pad on the front paw), and the carpal pad (which appears on the back of the front leg). Understanding these elements helps you create drawings that look authentic rather than cartoonish. The paw pads are typically darker than the surrounding fur and have a slightly textured, leathery appearance.
The structure varies slightly between front and back paws. Front paws are generally larger and more prominent, designed for bearing weight and providing traction. Back paws are often slightly more compact. Additionally, dogs frequently lick their paws, which affects the appearance and texture you might want to capture in your artwork.
Materials You’ll Need
Having the right tools makes the drawing process smoother and more enjoyable. Here’s what we recommend:
- Pencils: A range from HB to 4B works best. HB for light sketching, 2B for general drawing, and 4B for darker shading.
- Paper: Quality sketch paper with slight texture helps capture details. Avoid glossy paper that resists graphite.
- Erasers: Keep both a regular eraser and a kneaded eraser handy for corrections and highlights.
- Blending tools: Blending stumps or tortillons help create smooth transitions between shades.
- Ruler: Optional, but helpful for establishing proportions initially.
- Reference images: Collect high-quality photos of actual dog paws from various angles.
Having quality materials won’t make you a better artist, but they certainly make the process more enjoyable and help you achieve better results more easily.
Basic Steps to Draw a Dog Paw
Let’s break down the fundamental process into simple, manageable steps that even beginners can follow:
- Start with a light sketch: Use your HB pencil to lightly sketch the basic shapes. Begin with a large oval or rectangle for the main pad.
- Add the toe pads: Around the main pad, sketch four smaller ovals or circles for the toe pads. Position them slightly above and around the central pad.
- Define the edges: Gently outline the paw shape, connecting the pads and creating the overall silhouette.
- Add details: Sketch the lines between pads, the nail marks, and any fur texture around the edges.
- Refine proportions: Step back and check your proportions. Make adjustments as needed.
- Add shading: Begin with light shading using your 2B pencil, gradually building up darker tones.
- Create texture: Use various pencil strokes to create the leathery texture of the pads and the fur surrounding them.
- Final details: Add highlights and final shadow work to bring dimension to your drawing.
Drawing a Front Paw in Detail
Front paws are typically the most recognizable and popular choice for drawings. Here’s a detailed walkthrough:
Step 1: Sketch the Main Pad
Begin by drawing a large, slightly rounded rectangle or oval shape. This is your metacarpal pad—the largest pad on a dog’s paw. Make it about the size of your thumb nail on your paper. Don’t make it perfectly symmetrical; real paws have character and slight irregularities.
Step 2: Position the Toe Pads
Around and slightly above your main pad, sketch four smaller circles or ovals. These should be noticeably smaller than the central pad—roughly half the size. Space them evenly, with slight gaps between them. The arrangement typically forms a pattern where two toes sit at the top, one slightly to the left and one slightly to the right, with two more toes positioned lower.
Step 3: Connect with Fur
Sketch light, feathery lines connecting the pads to suggest fur. Dogs’ paws typically have fur between and around the pads. This isn’t rigid—let your lines be organic and flowing. The fur should extend slightly beyond the pads, creating a natural, lived-in appearance.
Step 4: Add Pad Details
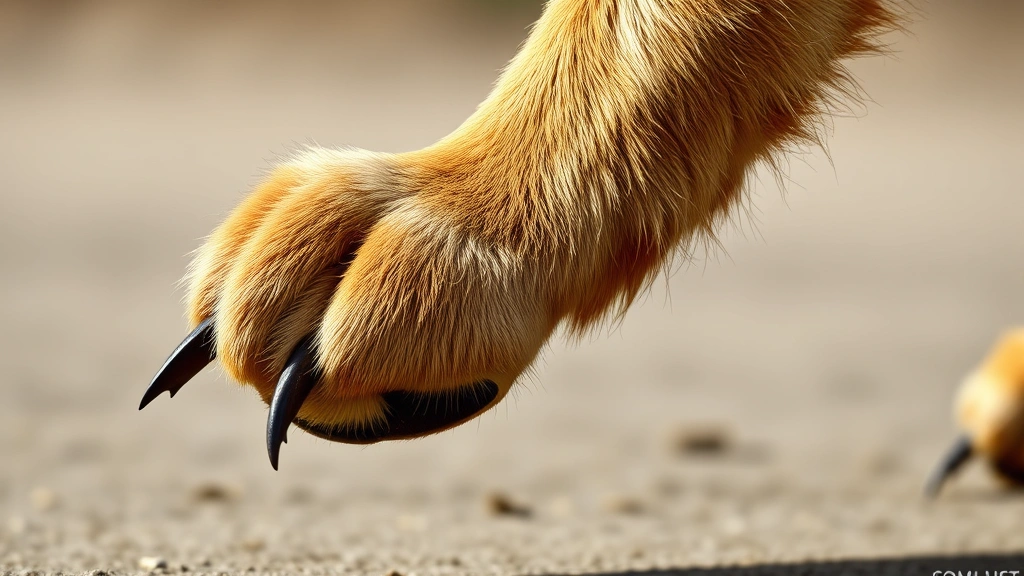
Now it’s time to add the subtle details that make paws realistic. Between each pad, sketch very light lines to indicate the grooves and separations. Add small lines at the bottom of each pad to suggest the nail or claw. These shouldn’t be thick lines—just subtle marks that indicate where the nail begins.
Step 5: Refine Your Outline
Using your 2B pencil, go over your sketch with slightly darker lines. Refine the edges of each pad, making them look more organic. Real paw pads aren’t perfectly circular—they’re slightly irregular with gentle curves. Pay attention to the overall shape and make sure it looks balanced.
Drawing a Back Paw in Detail
Back paws present a different challenge since they have only four toes (no dewclaw). They’re often slightly smaller and more compact than front paws:
Key Differences: The main pad on a back paw (called the plantar pad) is often more elongated than the metacarpal pad on front paws. The four toe pads are arranged similarly to front paws but in a more compact formation. Back paws often show more of the pad texture and less surrounding fur in typical reference images.
Drawing Process: Follow the same basic steps as front paws, but adjust your proportions. Make the central pad slightly more oval and elongated. Position only four toe pads instead of five. The overall shape should feel more compact and athletic. Understanding the difference in toe count between front and back paws is essential for anatomical accuracy.
Adding Shading and Texture
This is where your drawing transforms from a sketch to a realistic artwork. Proper shading and texture work creates dimension and makes your paw drawing come alive.
Creating Pad Texture: Dog paw pads have a distinctive leathery, slightly bumpy texture. To capture this, use short, irregular pencil strokes that follow the contours of each pad. Vary the pressure of your pencil—some areas should be darker, others lighter. This creates visual interest and authenticity. The texture should be denser in the center of each pad and slightly lighter at the edges.
Shading Techniques: Identify your light source before you begin shading. If light comes from the top-left, the bottom-right areas of your paw should be darker. Use your blending stump to smooth out harsh lines and create gradual transitions between light and shadow. Build your shading gradually—it’s easier to add more darkness than to remove it.
Highlighting the Fur: The fur surrounding the pads should be lighter than the pads themselves. Leave small white areas (the paper) to represent where light hits the fur. This creates a three-dimensional effect. Use longer, directional strokes to suggest fur direction and flow.
Advanced Techniques
Once you’ve mastered the basics, these advanced techniques will elevate your paw drawings to professional quality:
Perspective and Foreshortening: Draw paws from different angles and perspectives. A paw viewed from the side looks different than one viewed from above or at an angle. Understanding foreshortening—how objects appear shorter when viewed at certain angles—adds realism to your work.
Incorporating into Larger Compositions: If you’re interested in learning how to draw a dog cute, incorporating accurate paw drawings into full-body dog illustrations significantly improves your overall work. Practice drawing paws in context—attached to legs, reaching out, or resting on surfaces.
Using Reference Photos: Professional artists always use references. Collect a variety of dog paw photos showing different breeds, ages, and angles. Study how different dog breeds have slightly different paw characteristics. Large breed dogs have proportionally larger paws, while small breeds have delicate, compact paws.
Experimentation with Media: Once comfortable with graphite, experiment with other media. Colored pencils, charcoal, or digital drawing tools each offer unique possibilities for capturing paw details. Each medium has different blending and texture capabilities.
Common Mistakes to Avoid
Learning what not to do is just as important as learning what to do. Here are common pitfalls that trip up many artists:
- Oversimplifying the pads: Don’t make pads perfectly circular or identical. Real paws have character and variation. Each pad should have slightly different shapes and sizes.
- Ignoring the fur: A common mistake is drawing just the pads without the surrounding fur. The fur is crucial to making the paw look natural and complete.
- Poor proportions: Make sure your toe pads are noticeably smaller than the central pad. Incorrect proportions make the paw look anatomically wrong.
- Flat appearance: Use shading and texture to create dimension. Without proper shading, your paw will look like a flat, two-dimensional shape.
- Ignoring nail details: Small details like nails or claws make a huge difference in realism. Don’t skip these subtle elements.
- Inconsistent texture: Make sure your texture work is consistent across all pads. Avoid making one pad look rough and another smooth without reason.
If you’re concerned about specific paw health issues while studying reference photos, resources about why dogs chew their paws or how to stop dogs from licking paws can provide insights into paw conditions that might affect appearance. Additionally, the interesting phenomenon of why dog paws smell like Fritos relates to the natural bacteria and yeast on paw pads, which can be subtly suggested in your artwork through color variation.
Frequently Asked Questions
What’s the best way to practice drawing dog paws?
The best practice method is consistent repetition with varied references. Draw the same paw multiple times, then move to different angles and breeds. Keep a sketchbook dedicated to paw studies. Aim for at least 15-20 paw drawings before moving on to more complex compositions. This builds muscle memory and helps you internalize the proportions and structure.
How long does it typically take to draw a realistic dog paw?
A detailed, realistic paw drawing typically takes 30-60 minutes for beginners and 15-30 minutes for experienced artists. The time depends on your desired level of detail, the size of your drawing, and your familiarity with the subject. Don’t rush the process—quality takes time.
Should I use reference photos or draw from imagination?
Always use references, especially when learning. Even professional artists use references for accuracy. As you gain experience and internalize the structure, you can draw from imagination more confidently. However, even experienced artists refer back to photos for specific details or unusual angles.
What’s the difference between drawing cartoon paws and realistic paws?
Cartoon paws are simplified and stylized, often with exaggerated proportions and simplified details. Realistic paws require accurate anatomy, proper proportions, careful shading, and texture work. Both styles have merit—choose based on your artistic goals. Many artists master both styles.
Can I use digital tools to draw dog paws?
Absolutely! Digital drawing offers advantages like easy corrections, adjustable brush sizes, and layer management. Programs like Procreate, Photoshop, or free options like Krita work wonderfully for paw drawings. The principles remain the same whether you’re using graphite or a stylus.
How do I make my paw drawings look more three-dimensional?
Three-dimensionality comes from proper shading, highlighting, and understanding light sources. Use darker values in shadow areas and leave lighter areas for highlights. Blend your shades smoothly, and add texture that follows the contours of the paw. Understanding perspective and foreshortening also contributes significantly to three-dimensional appearance.
What breeds have the most distinctive paws?
Large breeds like German Shepherds and Golden Retrievers have proportionally larger, more prominent paws. Small breeds like Chihuahuas have delicate, compact paws. Breeds with hair between their toes (like Poodles and some terriers) have different visual characteristics than short-haired breeds. Studying breed-specific paw characteristics adds authenticity to your work.
How can I improve the texture of my paw pad drawings?
Texture comes from varied pencil strokes, pressure variation, and careful observation. Use short, irregular strokes that follow the pad’s contours. Vary your pencil pressure—some areas darker, others lighter. Use a blending stump to smooth some areas while keeping others textured. Study real paw photos closely to understand where texture is most prominent.