How to Draw a Dog Paw: Step-by-Step Guide
Whether you’re an aspiring artist, a devoted dog lover, or someone looking to create personalized pet artwork, learning how to draw a dog paw is an essential skill that opens up a world of creative possibilities. Dog paws are iconic symbols of our furry friends—they’re cute, expressive, and surprisingly fun to illustrate once you understand their basic anatomy and structure.
The beauty of drawing a dog paw lies in its simplicity combined with its recognizable charm. Unlike drawing an entire dog (which you can explore in our guide on how to draw a dog cute), focusing on just the paw allows you to master proportions, shading, and detail work without feeling overwhelmed. Plus, a well-drawn paw can be used in countless projects—from greeting cards to social media graphics, tattoo designs, or even as practice for larger compositions.
In this comprehensive guide, we’ll walk you through everything you need to know about drawing a dog paw, from understanding the anatomy to mastering advanced shading techniques. By the end, you’ll have the confidence and skills to create paws that look realistic, charming, or stylized—whatever your artistic vision demands.
Understanding Dog Paw Anatomy
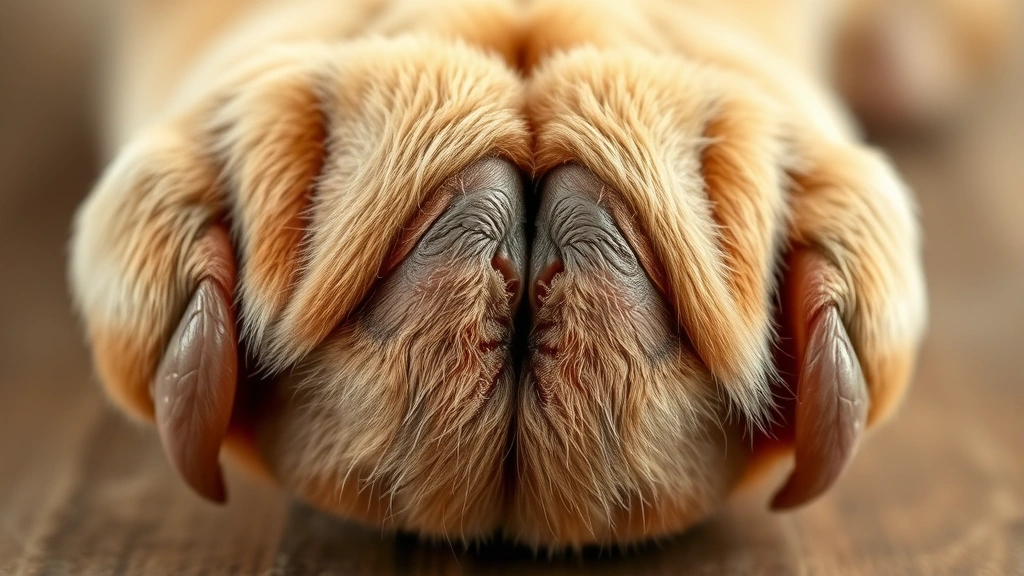
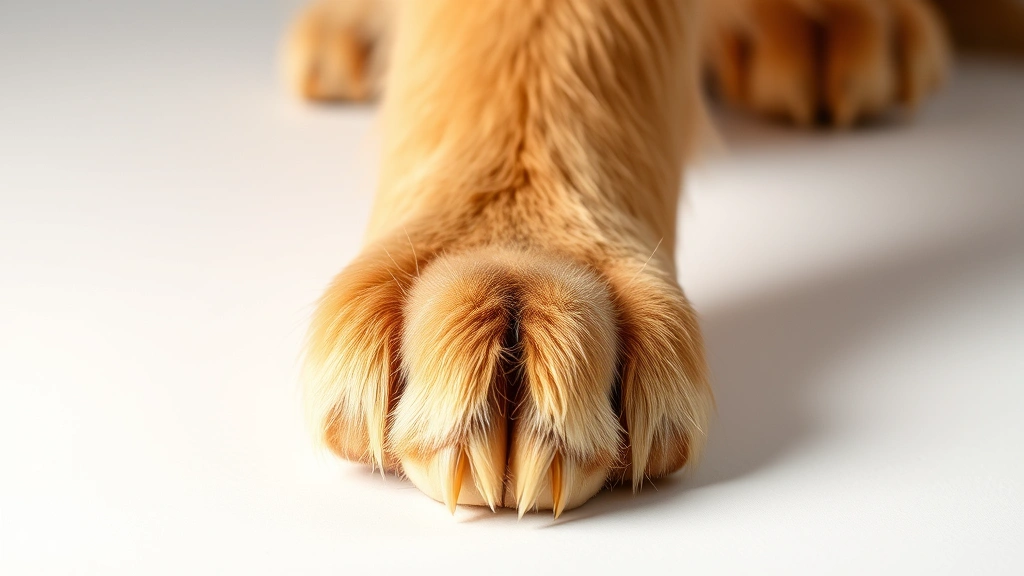
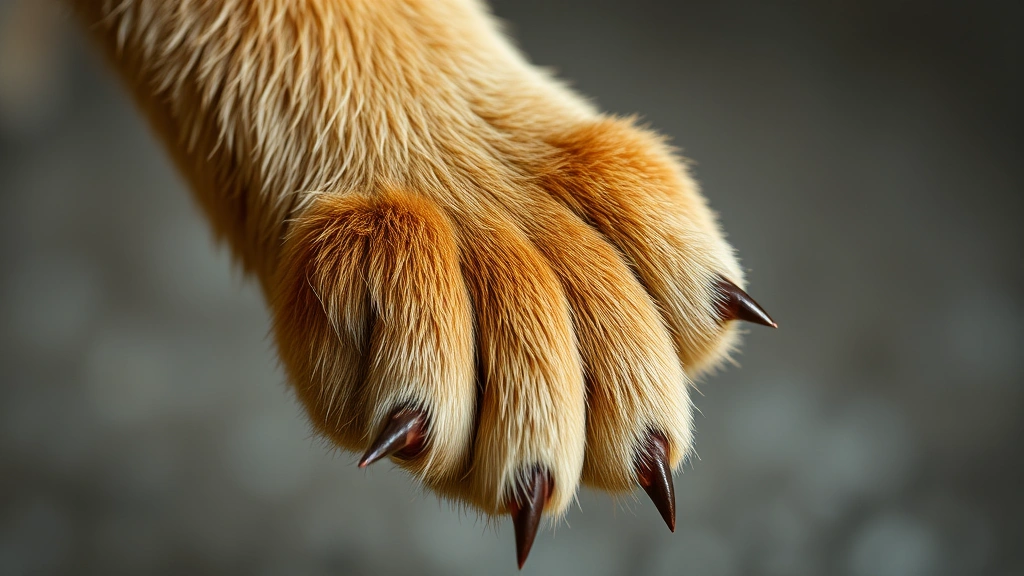
Before you put pencil to paper, it’s crucial to understand the actual structure of a dog paw. A dog’s paw consists of several key components that work together to create that adorable, distinctive shape we all recognize. According to the American Kennel Club, understanding canine anatomy helps artists capture authentic details.
The main pad, called the metacarpal pad or primary pad, forms the large, central cushion at the base of the paw. Surrounding this central pad are four smaller toe pads, each with its own distinct shape and position. Above the toe pads, you’ll find the toenails, which are typically dark and curved. Dogs also have a fifth toe on their front paws (the dewclaw), though this isn’t always visible depending on the paw’s angle.
The spacing between the pads is important to get right—they’re not evenly distributed, and the two middle toes are typically positioned slightly closer together than the outer toes. The main pad is roughly oval or heart-shaped, and it’s larger than any individual toe pad. Understanding this anatomy is what separates amateur drawings from professional-looking artwork.
If you’re curious about the fascinating aspects of dog paws beyond drawing, you might find it interesting that why do dog paws smell like fritos is a question many dog owners ask. While this is about paw care rather than drawing, it highlights just how important and unique dog paws are!
Materials You’ll Need
You don’t need an extensive art supply collection to draw a beautiful dog paw. However, having the right tools makes a significant difference in your final result. Here’s what we recommend:
- Pencils: Get a range from HB to 4B. The HB is perfect for light sketching, while 2B and 4B pencils are excellent for darker lines and shading.
- Paper: Use medium-weight drawing paper (around 90-110 lb). Avoid thin printer paper, which tears easily and doesn’t hold graphite well.
- Erasers: Keep both a regular eraser and a kneaded eraser on hand. Kneaded erasers are fantastic for subtle corrections and lightening areas.
- Blending tools: Blending stumps or tortillons help create smooth transitions between shades. You can also use a tissue or cotton swab in a pinch.
- Sharpener: A quality pencil sharpener keeps your tools precise and ready.
- Ruler: While not strictly necessary, a ruler helps establish proportions initially.
- Reference images: This is crucial! Have clear photos of dog paws from various angles nearby.
Optional but helpful materials include colored pencils if you want to add color, fixative spray to protect finished work, and a lightbox for tracing if you’re using the transfer method.
Starting with Basic Shapes
Every professional artist will tell you the same secret: start with basic geometric shapes. This foundational approach makes drawing a dog paw far less intimidating and significantly improves accuracy.
Begin by lightly sketching a large oval or rounded rectangle for the main pad. This should take up roughly the lower third of your drawing space. Next, sketch four smaller circles or ovals above this main pad—these will become your toe pads. Don’t worry about making them perfect; this is just the blocking-in phase.
Position these four toe circles carefully: place two in the center, slightly overlapping or very close together, and two on the outer sides. The outer toe circles should be slightly smaller than the center ones. Above each toe, add a tiny curved line to represent the toenail. This basic framework gives you a solid foundation to build upon.
The key at this stage is to use very light pressure with your pencil. You want these lines barely visible—they’re guides, not final artwork. Many beginners press too hard during this phase, making it difficult to erase later.
Step-by-Step Drawing Process
Step 1: Refine Your Pad Outlines
Using your basic shapes as a guide, begin refining the outline of the main pad. Dog paw pads aren’t perfectly smooth—they have subtle curves and sometimes small wrinkles or texture variations. Add gentle curves to create a more organic, natural shape. The top edge of the main pad should have slight indentations where the toe pads connect.
Step 2: Define the Toe Pads
Now focus on each toe pad individually. Make each one slightly different in shape and size—this creates realism and visual interest. The two center toes are usually more oval-shaped, while the outer toes can be rounder or slightly more irregular. Add small details like tiny creases or ridges that naturally occur on dog paws.
Step 3: Draw the Toenails
Toenails are where many drawings come alive. These aren’t simple lines—they’re curved, slightly pointed structures that protrude from the top of each toe. Draw them with a gentle arc, making sure they point slightly outward and downward. Toenails are typically darker than the pads themselves, so you’ll shade them more heavily later.
Step 4: Add Fine Details
Look closely at reference images and add subtle details: small wrinkles on the main pad, texture variations, and the slight webbing between toes if visible. These details separate a good drawing from a great one. However, don’t overdo it—less is often more in paw drawings.
Step 5: Establish Shadows and Light Source
Decide where your light source is coming from. This might seem like a small detail, but it’s crucial for creating dimension. Lightly sketch where shadows will fall—typically on one side of the pads and under the toenails. This roadmap guides your shading work.
Mastering Shading and Texture
Shading transforms a flat outline into a three-dimensional, lifelike drawing. This is where your paw really comes to life and where you can add personality to your artwork.
Creating Dimension with Gradation
Start with light shading using your 2B pencil. Apply graphite in the shadow areas using gentle, circular motions. Gradually increase pressure to create deeper shadows. The main pad should typically be lighter in the center and darker around the edges. This creates a subtle dome-like appearance that looks realistic.
Use your blending stump to smooth out pencil strokes and create seamless transitions between light and dark areas. This blending is what gives professional artwork that polished appearance. Work slowly—it’s easier to add more shading than to remove it.
Emphasizing the Toenails
Toenails should be among the darkest elements in your drawing. Use your 4B pencil to create deep shadows, leaving a small highlight area to suggest the nail’s curved surface. This contrast makes the nails pop and draws the viewer’s eye.
Adding Texture
Dog paws aren’t smooth like plastic—they have texture. Create this by varying your pencil pressure and using small marks to suggest the natural texture of the pads. Short, directional strokes can mimic the slightly rough surface of paw pads. This texture work is what separates amateur from professional artwork.
Creating Fur Around the Paw
If you’re drawing the paw with fur surrounding it (which is common), use quick, directional strokes to suggest fur texture. These strokes should follow the natural direction hair would grow. Vary the length and darkness of these strokes for a natural appearance.
Different Paw Variations
Once you master the basic dog paw drawing, you can explore numerous variations to expand your artistic repertoire. If you’re interested in how paws function and their role in dog health, you might explore topics like why do dogs lick their paws, which can actually inspire more expressive artwork.
Front Paw vs. Back Paw
Front paws are typically larger and more defined than back paws. Front paws have that distinctive dewclaw on the inside. Back paws are often more compact and lack the dewclaw. Practice drawing both to expand your skills.
Different Breeds
A Great Dane’s paw looks vastly different from a Chihuahua’s paw. Larger breeds have bigger, more spread-out pads, while small breeds have delicate, compact paws. Researching breed-specific paw characteristics adds authenticity to your work.
Paw Positions
Draw paws from different angles: straight-on, slightly angled, pressed flat, or with toes slightly splayed. Each position presents unique challenges and opportunities for artistic expression. Reference photos are invaluable for these variations.
Color and Medium Variations
While graphite is classic, try colored pencils, watercolors, or digital media. Pink paw pads are adorable, and adding subtle color variations makes your work truly special. You could also explore the topic of why are my dogs paws red for inspiration on color variations in your artwork.
Pro Tips and Common Mistakes
Pro Tips:
- Use reference photos religiously: Even experienced artists use references. Real paws are far more complex than our memories suggest.
- Practice proportions: The main pad should be roughly 1.5 to 2 times larger than any individual toe pad. Get this ratio right, and your paw will look immediately more realistic.
- Don’t make pads symmetrical: Perfect symmetry looks unnatural. Slight irregularities make drawings more lifelike.
- Layer your shading: Build darkness gradually rather than trying to get it right in one go. This gives you more control and better results.
- Highlight appropriately: Leave small white areas to suggest light reflection on the pads, especially on the main pad.
- Study actual dog paws: If you have a dog, observe their paws closely. Notice the color variations, texture, and shape. This observation translates directly into better artwork.
Common Mistakes to Avoid:
- Making all pads the same size: This is one of the most common errors. Remember, toe pads are smaller than the main pad, and they vary slightly from each other.
- Forgetting the dewclaw: On front paws, don’t forget that fifth toe! It’s a distinctive feature.
- Over-shading: It’s tempting to make everything very dark, but restraint creates better artwork. Light and shadow contrast is more effective than uniform darkness.
- Ignoring the space between pads: The gaps between pads are as important as the pads themselves. Don’t just focus on the pads and ignore the negative space.
- Drawing nails as simple lines: Toenails have dimension and curve. Treat them as three-dimensional structures, not flat lines.
- Skipping the planning phase: Rushing through basic shapes and anatomy leads to proportional problems later. Invest time upfront to save frustration.
If you’re interested in broader canine art topics, exploring how to how to draw a dog cute can provide context for how paw drawing fits into larger canine artwork.
For those interested in paw health and behavior, understanding how to stop dog from licking paws or learning how many toes does a dog have can inform your artistic choices and make your drawings more anatomically accurate.
Frequently Asked Questions
What’s the best paper for drawing dog paws?
Medium-weight drawing paper (around 90-110 lb) works best. Avoid thin printer paper, which doesn’t hold graphite well and tears easily. Cold-pressed paper has a slightly textured surface that’s ideal for capturing paw texture. Brands like Strathmore, Canson, and Fabriano are reliable choices that won’t break the bank.
How do I make my paw drawing look more realistic?
Use multiple reference photos from different angles, pay careful attention to proportions, and invest time in shading and blending. The most realistic drawings come from careful observation and patient layering of values. Don’t rush—realistic art takes time.
Can I draw a dog paw digitally?
Absolutely! Digital drawing has the advantage of unlimited undo options and easy adjustment of values. Use a stylus and tablet with art software like Procreate, Clip Studio Paint, or free options like Krita. The fundamental principles remain the same whether you’re working with graphite or digital tools.
How long does it take to draw a good dog paw?
A detailed, realistic paw drawing typically takes 30 minutes to an hour, depending on your experience level and the size of your drawing. Quick sketches might take 10-15 minutes, while highly detailed work could take 2-3 hours. Speed increases with practice.
What’s the best way to practice paw drawing?
Draw the same paw multiple times, focusing on different aspects each time. First, focus on proportions. Then, practice shading. Then, try different angles. Keeping a sketchbook dedicated to paw studies is an excellent way to track improvement and build muscle memory.
Should I draw with a pencil or pen?
For beginners, pencil is recommended because it’s forgiving and allows for corrections. Once you’re confident, you can experiment with pen, which creates bolder lines and prevents the temptation to over-erase. Many artists combine both: pencil for initial work and pen for final lines.
How do I draw paws in different fur colors?
The paw pad color depends on the dog’s coloring—pink pads for light-colored dogs, darker pads for darker-colored dogs. You can suggest this through your shading choices. For colored drawings, use appropriate colored pencils or paints to reflect the actual paw color.
Can I use these techniques for other animals?
Many techniques transfer to drawing cat paws, bear paws, and other animals. However, each animal has unique characteristics. Cats have retractable claws, bears have larger pads, and so on. The fundamental principles of anatomy, shading, and proportion apply universally, but you’ll need to study each animal’s specific features.