How to Use Dog Nail Clippers: Step-by-Step Guide
Let’s face it—dog nail maintenance isn’t exactly thrilling, but it’s absolutely essential for your furry friend’s health and comfort. Long nails can cause pain, affect your dog’s gait, and even lead to joint problems over time. Whether you’re a seasoned dog parent or a first-time owner, mastering the art of nail clipping will save you money, stress, and countless trips to the groomer. The good news? With the right tools, technique, and a little patience, you’ll become a pro in no time.
Many dog owners feel anxious about trimming their pet’s nails for the first time, and that’s completely understandable. The fear of hitting the quick (that sensitive pink part inside the nail) or causing your pup pain keeps plenty of people from even trying. But here’s the secret: once you understand the anatomy of a dog’s nail and follow a systematic approach, the process becomes second nature. This comprehensive guide will walk you through everything you need to know to confidently trim your dog’s nails at home.
Not only will you develop a valuable skill, but you’ll also strengthen your bond with your dog through gentle, caring grooming sessions. Plus, regular nail maintenance is part of a complete dog grooming guide that keeps your pup looking and feeling their best. Let’s dive in and demystify the process together.
Understanding Dog Nail Anatomy
Before you even pick up a clipper, it’s crucial to understand what you’re working with. A dog’s nail consists of several important parts: the outer shell (the hard part you see), the quick (a blood vessel and nerve bundle), and the nail bed beneath. The quick is sensitive and contains nerves, so hitting it causes pain and bleeding. This is why so many dog owners worry about the process—and rightfully so, because precision matters.
The challenge is that the quick’s location varies depending on your dog’s nail color. In light-colored or white nails, you can actually see the quick as a pinkish circle in the center. However, if you have a dog with dark or black nails, spotting the quick becomes significantly more difficult. This is where knowledge and technique become your best friends. Understanding how to cut dogs black toenails requires extra caution and a different approach than trimming lighter nails.
The nail grows continuously, and the quick grows along with it. This means that if your dog’s nails have been neglected for a long time, the quick may have extended further down the nail than usual. This is another reason why regular maintenance is so important—it keeps the quick from advancing too far, making future trims safer and easier.
According to the American Kennel Club, proper nail care is essential for your dog’s structural integrity and overall health. Long nails can cause your dog to walk abnormally, putting stress on their joints and spine.

Choosing the Right Nail Clippers
Not all dog nail clippers are created equal, and choosing the right tool makes a tremendous difference in your success rate. There are three main types of dog nail clippers available, and each has its pros and cons.
Scissor-style clippers work like regular scissors and are great for dogs with smaller nails. They offer good control and are often the most affordable option. Many people find them intuitive since they mimic familiar tools. However, they require significant hand strength, which can be problematic for people with arthritis or limited grip strength.
Guillotine-style clippers have a hole where you insert the nail, and a blade slides across to cut it. They’re particularly effective for medium-sized nails and provide a clean, quick cut. The main drawback is that they can crush the nail if not used correctly, potentially causing discomfort.
Grinder tools are electric or battery-powered devices that sand down the nail gradually. They’re excellent for anxious dogs since there’s no sudden cutting motion, and they reduce the risk of hitting the quick. The downside is that they take longer and can be noisy, which some dogs find frightening.
Beyond the clipper type, consider your dog’s size and nail thickness. Larger dogs with thicker nails need more heavy-duty clippers. Look for clippers with safety guards to prevent over-cutting, and always choose high-quality stainless steel to ensure clean cuts and longevity. A dull clipper will crush the nail rather than cutting cleanly, causing pain and potential infection.
Preparing Your Dog for Nail Trimming
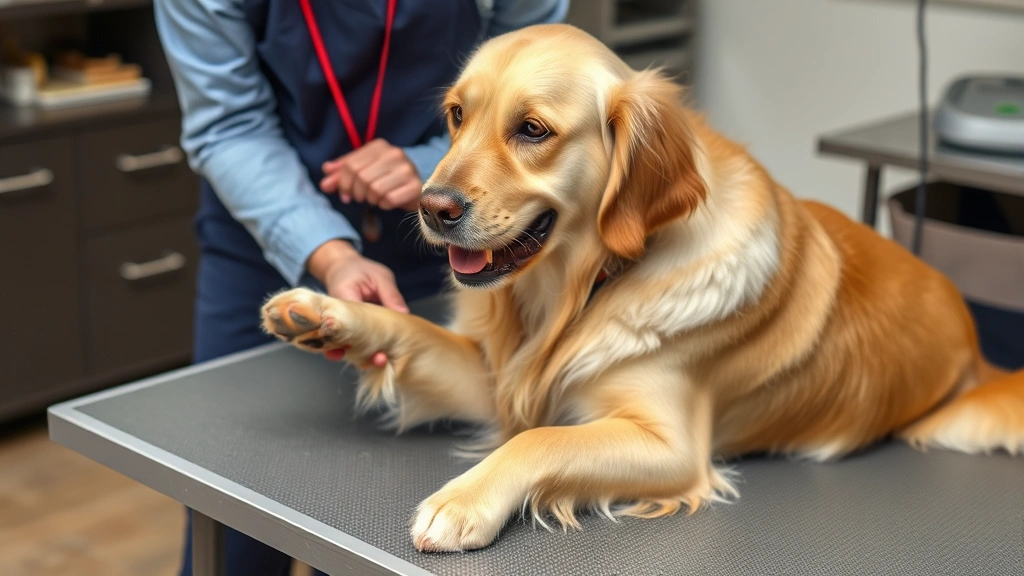
The most successful nail trimming sessions start with proper preparation. Your dog needs to be calm, comfortable, and ideally, already accustomed to having their paws handled. If your pup isn’t used to paw touching, spend a few days or weeks simply handling their feet, massaging their paws, and playing with their toes. This desensitization makes the actual trimming far less stressful.
Choose a quiet, well-lit area where you can work comfortably. Good lighting is absolutely essential—you need to see clearly to identify where the quick is and to make precise cuts. Poor lighting is one of the leading causes of accidental quick injuries. Consider positioning your dog at a comfortable height on a table or elevated surface so you don’t have to bend over excessively.
Have all your supplies ready before you start: clippers, styptic powder (for stopping bleeding if you do hit the quick), treats, and a towel. Some people find it helpful to have another person present to help keep their dog calm or to provide treats as positive reinforcement. Making the experience pleasant is key to your dog accepting regular nail trims.
Timing matters too. Trim nails when your dog is naturally calm and relaxed, not when they’re excited or wound up. Many people find early morning or after a good exercise session works well. Your dog’s energy level directly impacts their cooperation, so work with their natural rhythms rather than against them.
Step-by-Step Nail Clipping Process
Now for the main event. Here’s exactly how to trim your dog’s nails safely and effectively:
Step 1: Get Your Dog Comfortable
Position your dog on a stable surface where they feel secure. If they’re on a table, have someone hold them gently or use a non-slip mat. Speak in a calm, encouraging voice throughout the process. Your dog picks up on your emotions, so staying relaxed helps them stay relaxed too.
Step 2: Examine the Nail
Pick up one paw and examine the nail carefully. If it’s a light-colored nail, you should be able to see the quick as a darker circle or oval in the center. For dark nails, you’ll need to look at the underside of the nail where you might see a small dark dot in the center—that’s the quick. Never trim closer than 2-3mm from the quick.
Step 3: Position the Clippers Correctly
Hold the clippers perpendicular to the nail (at a 90-degree angle) and position them to cut just the clear or light-colored part of the nail. The nail should be fully inserted into scissor-style clippers or positioned correctly in guillotine-style clippers. Make sure your fingers are clear of the cutting area.
Step 4: Make a Quick, Decisive Cut
Don’t hesitate or second-guess yourself once you’ve positioned the clippers. A quick, confident motion results in a clean cut. Slow or tentative cuts can crush the nail. If you’re unsure about where to cut, err on the side of caution and cut less rather than more—you can always trim more later.
Step 5: Check the Nail
After cutting, examine the nail’s cross-section. If you see a small dark dot in the center, that’s the quick, and you’ve cut the perfect amount. If you’re seeing more and more of that dark center with each cut, you’re getting close to the quick and should stop.
Step 6: Repeat and Reward
Move to the next nail and repeat the process. After completing all nails, or even after every few nails, reward your dog with treats and praise. This positive reinforcement makes future sessions much easier. Remember, you’re teaching your dog that nail trimming is not a scary experience.
For specific guidance on particular situations, many dog owners find it helpful to reference how to cut a dog’s nails using proper technique. Additionally, if you’re working with darker nails, learning to trim black dog nails requires extra attention and a slightly modified approach.
Dealing with Black Nails
Black or dark-colored nails present a unique challenge because you can’t see the quick easily. This is where many beginners struggle, but there are proven strategies to handle this situation safely.
The most reliable method is to look at the underside of the nail where you might see a small dark spot in the center—that’s the quick. Another approach is to make small cuts and examine the nail after each cut. You’re looking for a small dark circle appearing in the center of the cut surface. When you see that dark circle, you’re within 1-2mm of the quick and should stop trimming that nail.
Some groomers use the gradual approach: trim a small amount, check the underside, trim a bit more, and keep checking until you see that telltale dark dot. It takes longer but significantly reduces the risk of hitting the quick. Understanding how to trim black dog nails is essential knowledge for any dog owner, and taking extra time with dark nails is always worthwhile.
The ASPCA recommends being particularly cautious with dark nails and suggests consulting a veterinarian or professional groomer if you’re uncomfortable with the process. There’s absolutely no shame in getting professional help when you need it.
Safety Tips and Common Mistakes
Safety Tips:
- Always use sharp clippers—dull clippers crush nails rather than cutting cleanly
- Never trim when your dog is anxious or struggling—wait for a calm moment
- Keep styptic powder handy in case you accidentally hit the quick
- Trim nails regularly (every 3-4 weeks) to keep the quick from advancing
- Work in good lighting where you can see clearly
- Have treats ready to make the experience positive
- Don’t rush—a calm, methodical approach is always safer
- Trim only the clear or light-colored part of the nail
Common Mistakes to Avoid:
- Cutting too short: The most common error. Remember the 2-3mm safety zone from the quick.
- Using dull clippers: This causes pain and nail damage. Replace clippers regularly.
- Working in poor lighting: You can’t see what you’re doing, leading to accidents.
- Forcing a struggling dog: If your dog is panicking, stop and try again later. Forcing the issue creates negative associations.
- Ignoring signs of infection: If a nail becomes red, swollen, or infected after trimming, contact your vet.
- Waiting too long between trims: Regular maintenance keeps the quick from extending too far.
If you do accidentally hit the quick and your dog’s nail bleeds, don’t panic. Apply styptic powder directly to the nail and hold gentle pressure for a few minutes. If the bleeding doesn’t stop after 10 minutes, contact your veterinarian. For more detailed information on handling this situation, check out our guide on how to stop a dog’s nail from bleeding.
When to Seek Professional Help
There’s absolutely nothing wrong with taking your dog to a professional groomer or veterinarian for nail trims. In fact, many dog owners choose this option for various valid reasons.
Consider professional help if:
- Your dog is extremely anxious or aggressive during nail trimming
- Your dog has very thick, brittle, or deformed nails
- You have physical limitations that make it difficult to handle your dog safely
- Your dog has a medical condition affecting their nails
- You’re simply not comfortable with the process
- Your dog has had a bad experience with nail trimming in the past
Professional groomers trim nails daily and have extensive experience with all nail types and dog temperaments. They also have specialized equipment and can handle difficult situations with expertise. The cost is typically reasonable, especially when you consider the value of your peace of mind and your dog’s safety.
Your veterinarian can also perform nail trims and can address any underlying health issues that might affect your dog’s nails. If you notice abnormal nail growth, discoloration, or signs of infection, definitely consult your vet. According to VCA Animal Hospitals, regular professional assessment ensures any nail problems are caught early.
Remember that learning to trim your dog’s nails at home is a valuable skill, but it’s not mandatory. Some people prefer to have professionals handle it, and that’s a perfectly valid choice. The most important thing is that your dog receives regular nail maintenance, whether you do it yourself or have someone else do it.
As part of your overall grooming routine, don’t forget that nail care works best alongside other grooming practices. Learning about your complete dog grooming guide and even how to give a dog a bath will help you maintain your dog’s overall health and appearance.
Frequently Asked Questions
How often should I trim my dog’s nails?
Most dogs need their nails trimmed every 3-4 weeks. However, this varies based on your dog’s activity level, nail growth rate, and lifestyle. Dogs who spend a lot of time on hard surfaces (concrete, asphalt) wear their nails down naturally and may need less frequent trimming. Indoor dogs typically need more frequent trims. If you hear your dog’s nails clicking on the floor, it’s time for a trim.
What should I do if I accidentally cut the quick?
Stay calm—it happens to everyone. Apply styptic powder directly to the nail and hold gentle pressure for a few minutes. If you don’t have styptic powder, a small amount of flour or cornstarch can help stop the bleeding in a pinch. Avoid letting your dog lick the nail excessively. Most minor quick injuries heal within a few days without intervention, but if bleeding continues or signs of infection appear, contact your veterinarian.
Can I use human nail clippers on my dog?
While technically possible for very small dogs, it’s not recommended. Human nail clippers are designed for soft human nails and don’t work well on the harder, thicker structure of dog nails. They can crush the nail instead of cutting cleanly, causing pain and potential damage. Invest in proper dog nail clippers—they’re not expensive and make the job much easier and safer.
Why does my dog hate having their nails trimmed?
Dogs may dislike nail trimming for several reasons: fear of the unfamiliar sensation, past negative experiences, or anxiety about the process. Start by handling your dog’s paws regularly to desensitize them. Make the experience positive with treats and praise. If your dog has had a traumatic experience, professional help might be necessary to rebuild their trust. Never force a panicked dog—patience is key.
What type of nail clipper is best for my dog?
The best clipper depends on your dog’s size, nail thickness, and your personal preference. Scissor-style clippers work well for most dogs and offer good control. Guillotine-style clippers are great for medium-sized nails and provide clean cuts. Grinders are excellent for anxious dogs and reduce quick-hitting risks. Try different types to see what works best for you and your dog. Many pet stores let you handle different clippers before buying.
Is it normal for my dog’s nails to bleed a little after trimming?
A tiny amount of bleeding is sometimes normal if you’ve trimmed very close to the quick without actually hitting it. However, significant bleeding indicates you’ve hit the quick. If there’s just a small amount of bleeding, apply styptic powder and monitor it. The bleeding should stop within a few minutes. If you’re regularly seeing blood, you’re cutting too short—be more conservative with your trim length.
Can I trim my dog’s nails if they have a medical condition?
If your dog has any medical conditions affecting their nails, joints, or overall health, consult your veterinarian before trimming. Conditions like arthritis might make it difficult for your dog to stand still, and other health issues could affect nail structure. Your vet can advise you on the best approach and might recommend professional grooming services.