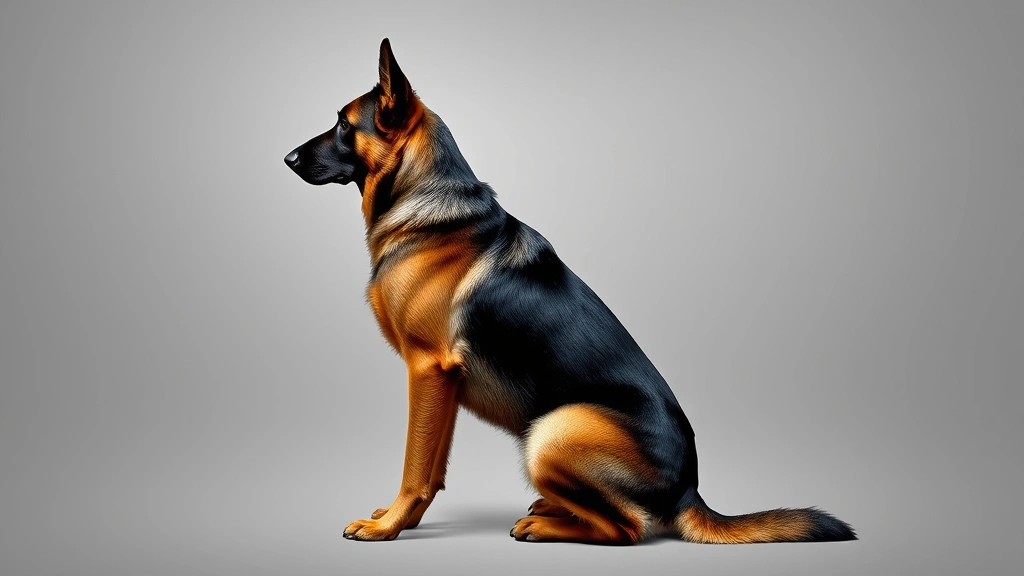
How to Draw a Realistic Dog: Step-by-Step Guide
Whether you’re an aspiring artist or just looking to impress your friends with your newfound skills, learning how to draw a realistic dog is an incredibly rewarding journey. There’s something magical about translating the beauty, personality, and unique features of our furry best friends onto paper. From the soft texture of their fur to the soulful expression in their eyes, capturing a dog’s likeness requires patience, practice, and a solid understanding of anatomy.
Drawing dogs realistically isn’t as intimidating as it might seem. With the right techniques, materials, and a willingness to practice, you’ll be creating stunning canine portraits in no time. This comprehensive guide will walk you through every step of the process, breaking down the complex task into manageable, digestible lessons that anyone can follow.
Before we dive into the nitty-gritty of shading and proportions, it’s worth noting that realistic dog drawing builds on foundational skills. If you’re completely new to art, you might also enjoy exploring how to draw a dog cute as a starting point, which uses simpler techniques that are easier to master before tackling realism.
Essential Materials and Tools
Before you put pencil to paper, you’ll want to gather the right supplies. Quality materials make an enormous difference in your final artwork, and investing in decent tools will set you up for success from the start.
The foundation of any good drawing starts with pencils. For realistic dog drawings, you’ll want a range of graphite pencils with different hardness levels. A typical set should include:
- HB or 2H – for light sketching and initial outlines
- 2B to 4B – for medium tones and general drawing
- 6B to 8B – for dark values and deep shadows
Quality paper is equally important. Look for paper with a slight tooth (texture) that can hold graphite well. Strathmore, Canson, and Clairefontaine are excellent brands. A weight of at least 90-110 lb (140-160 gsm) will prevent buckling when you erase and rework areas.
You’ll also need:
- Erasers – both a standard rubber eraser and a kneaded eraser for fine details
- Blending tools – blending stumps, tortillons, or even tissue for smooth transitions
- Sharpener – a quality pencil sharpener keeps your points precise
- Ruler – helpful for measuring proportions accurately
- Fixative spray – to protect your finished work from smudging
Many artists also use a light box or tracing paper to transfer reference images, though this isn’t mandatory if you’re comfortable drawing freehand.
Understanding Dog Anatomy
The key to drawing realistic dogs is understanding their underlying anatomy. Dogs have a skeletal structure that’s quite different from humans, and grasping these differences is fundamental to creating convincing artwork.
A dog’s body is composed of several distinct regions: the head, neck, chest, abdomen, and four limbs. Unlike humans, dogs have their front legs positioned more forward on their body, and their spine is much more flexible. This flexibility allows them to move with remarkable grace and agility.
Understanding how dogs see at night and perceive the world can actually help you draw their eyes with more authenticity and emotion. Dogs have larger pupils and a reflective layer behind their retinas called the tapetum lucidum, which contributes to that distinctive gleam in their eyes when light hits them.
The skull structure varies dramatically between breeds. Some dogs have long, narrow muzzles (like Greyhounds), while others have broad, flat faces (like Bulldogs). Understanding these breed-specific features is crucial for accurate representation. The eyes are positioned on the sides of the head in most dogs, giving them a wider field of vision than humans.
The muscle structure beneath the skin creates the contours you’ll see on the surface. Dogs have well-developed chest muscles, shoulder muscles, and leg muscles that create visible definition, especially in athletic breeds. Learning to sketch these underlying muscles before adding fur will dramatically improve your realism.
Getting Proportions Right
Accurate proportions are the backbone of realistic dog drawing. Even with perfect shading, if the proportions are off, the drawing won’t look right. Here’s how to nail them:
Head-to-body ratio: A dog’s head is typically about one-quarter to one-third the length of its body. This varies by breed – longer-bodied dogs like Dachshunds have smaller head-to-body ratios, while shorter dogs like Pugs have larger heads relative to their bodies.
Leg length: Front legs are usually about the same length as the distance from the dog’s chest to its hindquarters. Hind legs are often slightly longer and more muscular. The paws should be proportional to the legs – oversized paws on a small dog, or vice versa, will immediately make the drawing look wrong.
If you want to learn more about specific body parts, our detailed guide on how to draw a dog paw breaks down foot anatomy in excellent detail, which you can apply to your full-body drawings.
Muzzle proportions: The muzzle length varies dramatically by breed. For most dogs, the muzzle is about one-third the length of the head. The nose is positioned at the very tip of the muzzle, and the eyes are set back from the nose.
Ear placement: Ears are typically positioned at the top-back of the skull. Their size and shape vary incredibly – from tiny ears on a Chihuahua to large floppy ears on a Cocker Spaniel.
A helpful technique is to use the “measurement method.” Using your pencil or a ruler, measure the length of your reference image’s head, then use that as a unit of measurement for the rest of the body. This ensures proportional accuracy.
Starting with Basic Shapes
Every professional artist starts with basic shapes. This foundational technique makes the drawing process less overwhelming and ensures structural accuracy.
Step 1: Establish the basic framework
Begin by lightly sketching basic shapes that represent the major body parts:
- A circle or oval for the head
- A larger oval or cylinder for the chest
- An oval or rectangle for the abdomen
- Cylinders or elongated ovals for each leg
- A curved line or thin oval for the tail
These shapes don’t need to be perfect – they’re just guidelines. Use very light pressure with your HB pencil so they’re easy to erase later.
Step 2: Establish the center line
Draw a light line down the center of the head and body. This helps you maintain symmetry and ensures the dog’s features are balanced. The center line should follow the natural curve of the spine.
Step 3: Block in the limbs
Using simple lines, sketch where the legs will be positioned. Remember that front legs are more vertical, while hind legs often have more of a bend at the joint. The angle of the legs dramatically affects the pose and energy of your drawing.
Step 4: Rough in the tail
The tail’s position and curve convey a lot about the dog’s mood and movement. A raised tail suggests alertness or happiness, while a lowered tail might indicate submission or fear.
Mastering Facial Features
The face is where you’ll capture the dog’s personality and likeness. This section requires extra attention and patience.
Drawing the eyes
Eyes are the most expressive feature and deserve careful study. Dogs’ eyes are typically almond-shaped, though this varies by breed. Here’s the process:
- Lightly sketch the eye shape using the proportions you’ve established
- Mark the position of the iris, which is usually centered in the eye or slightly toward the inner corner
- Draw a smaller circle within the iris for the pupil
- Add a small highlight (usually in the upper-left area) – this is crucial for making the eye look alive and wet
- The upper eyelid is usually darker and more defined than the lower lid
- Add the tear duct at the inner corner
The expression in the eyes is everything. Even slight adjustments to the pupil position or highlight placement can completely change the dog’s emotional expression. Practice drawing eyes repeatedly until you develop a feel for their subtleties.
Shaping the nose
Dog noses are typically moist and have a slightly bumpy texture. The nose is generally dark (black, dark brown, or dark gray depending on the dog’s coloring) and has two nostrils. The shape varies by breed – some are broad and flat, others are more pointed.
When drawing the nose:
- Keep it darker than most of the face
- Show the texture with small, subtle lines indicating the bumpy surface
- Add a small highlight to show moisture
- Make sure the nostrils are asymmetrical – they rarely line up perfectly
Perfecting the mouth and muzzle
The mouth is less prominent on dogs than on humans, but it’s still important for expression. Dogs’ mouths typically form a gentle line from the nose toward the back of the jaw. The lips vary in color and prominence depending on the breed and individual dog.
The muzzle extends from below the nose to the jaw. This area often has lighter coloring and different fur direction than the rest of the face. Pay attention to how fur grows around the muzzle – it typically follows the contours of the underlying bone structure.
Ear details
Ears can be tricky because they’re often complex shapes with lots of texture. Start by establishing the overall ear shape, then add internal details like the inner ear texture and fur direction. Remember that ears are often semi-transparent – light can show through thinner areas, creating subtle gradations of color.
Drawing the Body Structure
Once you’ve nailed the head, moving to the body becomes much more manageable. The body is where you’ll really showcase your understanding of dog anatomy and movement.
The chest and shoulders
The chest is the widest part of most dogs’ bodies and is heavily muscled. This is where you’ll see prominent definition, especially in athletic or lean breeds. The shoulder muscles connect the front legs to the body and create visible curves and angles.
When drawing the chest:
- Show the width with curved lines that suggest the rib cage beneath
- Indicate muscle definition with subtle shading and line work
- Remember that the chest tapers slightly toward the abdomen
- The front legs emerge from the sides of the chest, not the front
The back and spine
The back line (often called the “topline” in dog breed standards) is a key element of your dog’s silhouette. This line should follow the natural curve of the spine and reflect the dog’s breed characteristics. Some dogs have level backs, others have sloped backs that descend toward the rear.
The spine itself isn’t visible, but understanding its S-curve helps you draw the body more naturally. Dogs have remarkable spinal flexibility, and this should be evident in your drawing through natural, flowing lines.
The abdomen and hindquarters
The abdomen is typically narrower than the chest and often has a slight tuck where it meets the hind legs. The hindquarters are heavily muscled – this is where the dog’s power comes from. The hind legs are usually longer and more muscular than the front legs.
When drawing the hindquarters:
- Show the muscle definition in the thighs and calves
- Remember that the hind legs bend at the hock (equivalent to our ankle)
- The rear end should have a rounded, muscular appearance
- Pay attention to how the legs angle – this affects the dog’s posture and mood
The tail
Tails are wonderfully expressive and vary dramatically in shape, length, and carriage. A tail in motion creates a sense of energy and life in your drawing. Remember that tails have bones and muscles, so they should have structure – they’re not just limp appendages.
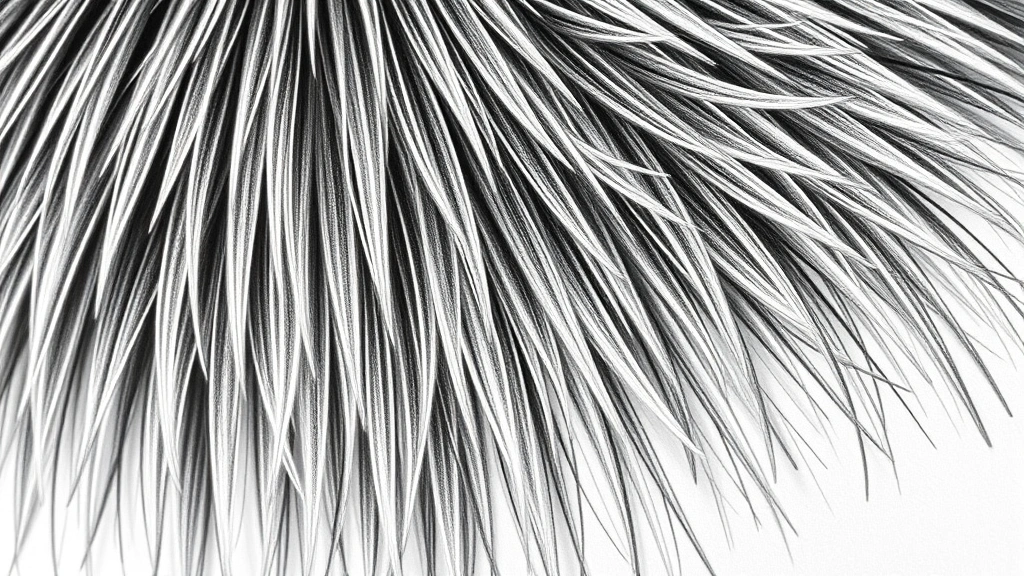
Creating Realistic Fur Texture
This is where your drawing truly comes to life. Realistic fur texture is what separates a good drawing from a great one. Understanding how to render fur is essential to mastering realistic dog drawing.
Direction of fur growth
Before you even think about shading, study how fur grows on your reference image. Fur doesn’t grow randomly – it follows the contours of the body and grows in specific directions. On the head, fur typically grows away from the center of the face. On the body, fur generally grows downward and backward. Understanding this pattern is crucial.
Short-haired breeds
For short-haired dogs like Labradors or Boxers, use short, directional pencil strokes that follow the fur growth pattern. These strokes should be relatively close together to create a smooth appearance. Vary the pressure and length of your strokes to create visual interest and prevent the fur from looking flat.
Long-haired breeds
Long-haired dogs like Golden Retrievers or German Shepherds require longer, flowing strokes. Use longer pencil marks that follow the fur direction. Layer these strokes, allowing some to be darker and longer while others are lighter and shorter. This layering creates depth and volume.
Curly and wiry coats
For curly-haired breeds like Poodles or Doodles, use small circular or spiral motions to suggest the texture. These breeds have fur that stands out from the body, so your marks should reflect this three-dimensional quality. Leave some white paper showing to indicate where light hits the curls.
Texture techniques
Several techniques help create realistic fur texture:
- Crosshatching: Layering lines in different directions creates texture and depth
- Stippling: Using small dots to build up tone and texture
- Dry brushing: If using graphite powder or charcoal, dry brush techniques create wonderful texture
- Negative space: Sometimes what you don’t draw is as important as what you do – leaving some white paper shows light reflecting off fur
Remember that you learned about why dogs like squeaky toys – understanding dog behavior and anatomy helps you draw them more authentically, capturing their natural movements and expressions.
Shading and Depth
Shading is what transforms a line drawing into a realistic, three-dimensional image. Proper shading creates volume, depth, and the illusion of fur texture.
Understanding light and shadow
Before you start shading, establish a consistent light source. Where is the light coming from? This determines where shadows will fall. Most portraits use lighting from the front or slightly to one side, which creates dimension without being too dramatic.
Creating a value scale
Develop a personal value scale using your pencils. This shows you the range from white paper (lightest) to the darkest marks you can make. Understanding your medium’s full range helps you use it effectively. A good practice is to create a value scale from HB to 8B, showing the progression from light to dark.
Building up layers
Realistic shading is built in layers, not applied all at once. Start with your lighter pencils (HB to 2B) and gradually introduce darker values with harder pencils (4B to 8B). This layering approach allows you to:
- Maintain control and avoid over-darkening areas
- Create smooth transitions between values
- Build up texture gradually
- Make corrections if needed before committing to dark values
Shadow placement
Shadows typically fall on the side of the dog opposite the light source. Key shadow areas include:
- Under the chin and jaw
- In the eye sockets
- Along the underside of the body
- Between the legs
- Under the ears
- In the corners of the mouth
Using highlights strategically
Highlights are areas where light hits the dog most directly. They’re usually the lightest parts of your drawing and are crucial for creating a sense of three-dimensionality and shine (especially important for showing wet noses and eyes). Common highlight areas include:
- The top of the head
- The bridge of the nose
- The cheekbones
- The top of the back
- The upper surfaces of the legs
Creating soft transitions
Use blending tools like blending stumps or tortillons to soften transitions between values. This is especially important in areas like the muzzle and around the eyes where you want smooth gradations rather than harsh lines. However, don’t over-blend – some texture and definition should remain visible.
Common Mistakes to Avoid
Learning what NOT to do is just as important as learning what to do. Here are common pitfalls that trip up many dog artists:
Mistake 1: Inconsistent proportions
The most common error is allowing proportions to drift as you draw. One eye ends up larger than the other, or the legs vary in length. Combat this by frequently stepping back from your work and comparing it to your reference image. Use measurement techniques to verify proportions regularly.
Mistake 2: Flat, lifeless eyes
Eyes without proper highlights or with pupils that don’t align correctly look dead and lifeless. Always include a bright highlight and ensure pupils are positioned correctly. The eyes are the window to the soul – spend extra time getting them right.
Mistake 3: Ignoring the reference image
Working from memory or imagination is tempting, but even experienced artists rely heavily on reference images. A good reference image is your most important tool. Use it constantly, checking proportions, colors, values, and details throughout your drawing process.
Mistake 4: Over-rendering everything equally
Not every part of your drawing needs to be equally detailed. Focal points (usually the face and especially the eyes) should be more detailed, while background areas or less important features can be suggested with less detail. This creates visual hierarchy and guides the viewer’s eye.
Mistake 5: Harsh, unrealistic shading
Real fur doesn’t have harsh lines or uniform shading. Build shading gradually, use blending techniques, and vary your marks to create natural-looking transitions. Realistic shading is subtle and nuanced.
Mistake 6: Neglecting to understand breed characteristics
Each breed has distinctive features. A Chihuahua should look different from a Great Dane beyond just size. Study breed-specific characteristics like ear shape, muzzle length, and overall body proportion. If you’re curious about different breeds, take our what dog breed am I quiz to explore breed diversity.
Mistake 7: Forgetting about fur direction
Fur that grows in random directions looks unnatural. Always pay attention to how fur grows and let your pencil strokes follow this pattern. This single element dramatically increases realism.
Frequently Asked Questions
How long does it take to draw a realistic dog?
The time varies greatly depending on your experience level, the size of your drawing, and the complexity of the dog’s features. A beginner might spend 10-20 hours on a detailed portrait, while an experienced artist might complete one in 5-10 hours. Small sketches can take 1-2 hours, while large, highly detailed pieces can take 30+ hours.
What’s the best reference image to use?
The best reference images are clear, well-lit photos taken straight-on or from a three-quarter angle. Avoid photos with harsh shadows or backlighting when you’re starting out. Professional dog photography or breed standard photos work wonderfully. Multiple reference images showing different angles can help you understand the dog’s structure better.
Should I use a light box to trace my reference image?
Using a light box to transfer basic proportions is perfectly acceptable and is used by many professional artists. However, avoid tracing every detail – you’ll learn much more by drawing freely. Light boxes are best used for establishing basic shapes and proportions, then drawing the rest freehand.
What if I make a mistake while drawing?
Mistakes are learning opportunities! If you’ve drawn something incorrectly, use a kneaded eraser to gently lift graphite from the problem area. For major errors, you can lightly shade over the mistake and redraw on top. This is why starting light is so important – light marks are easy to correct.
How can I improve my dog drawing skills?
Practice is the primary ingredient. Draw regularly, study anatomy, and work from reference images. Consider drawing the same dog multiple times from different angles. Study how professional artists render dogs. Join online communities and get feedback on your work. Watch tutorial videos and take courses. Most importantly, be patient with yourself – realistic drawing is a skill that develops over time.
What pencil grades are best for realistic drawing?
For realistic dog drawings, a range from HB to 8B is ideal. Start with HB or 2H for light sketching, use 2B-4B for general drawing and medium tones, and save 6B-8B for the darkest values and details. The exact pencils you prefer may vary based on your personal style and paper choice.
Can I use colored pencils or charcoal instead of graphite?
Absolutely! Many artists create stunning realistic dog drawings using colored pencils, charcoal, or mixed media. Each medium has its own learning curve and unique advantages. Colored pencils offer precision, charcoal offers dramatic values, and mixed media allows you to combine techniques. The fundamental principles of anatomy, proportion, and shading remain the same regardless of medium.
How do I draw dogs in different poses?
Understanding anatomy is crucial for drawing dogs in various poses. Study how the spine bends, how the legs angle, and how the body shifts with movement. Start with basic shapes and gesture lines to establish the pose, then build up the details. Practice drawing your dog or reference images in different positions until you develop a feel for how the body moves.