How to Collapse a Dog Crate: Step-by-Step Guide
If you’re a dog owner who travels frequently, moves homes, or simply needs to store your pup’s crate when it’s not in use, knowing how to collapse a dog crate is an absolute game-changer. Whether you have a wire crate, plastic carrier, or fabric pen, these collapsible designs are engineered for convenience—but sometimes they can feel like a puzzle box designed by someone who’s never actually owned a dog.
The good news? Collapsing your dog crate doesn’t require a degree in engineering or superhuman strength. With the right technique and a little patience, you can fold up most standard crates in under five minutes. This comprehensive guide will walk you through every step of the process, from identifying your crate type to storage tips that’ll keep your space clutter-free.
Whether you’re preparing for a road trip with your furry friend or just need to reclaim some living room real estate, mastering this simple skill will save you time and frustration. Let’s dive into the world of crate collapsing!
Identifying Your Dog Crate Type
Before you start collapsing anything, it’s important to know what you’re working with. Dog crates come in three main varieties, and each one has its own collapsing method. Understanding your specific crate type will make the entire process smoother and prevent potential damage.
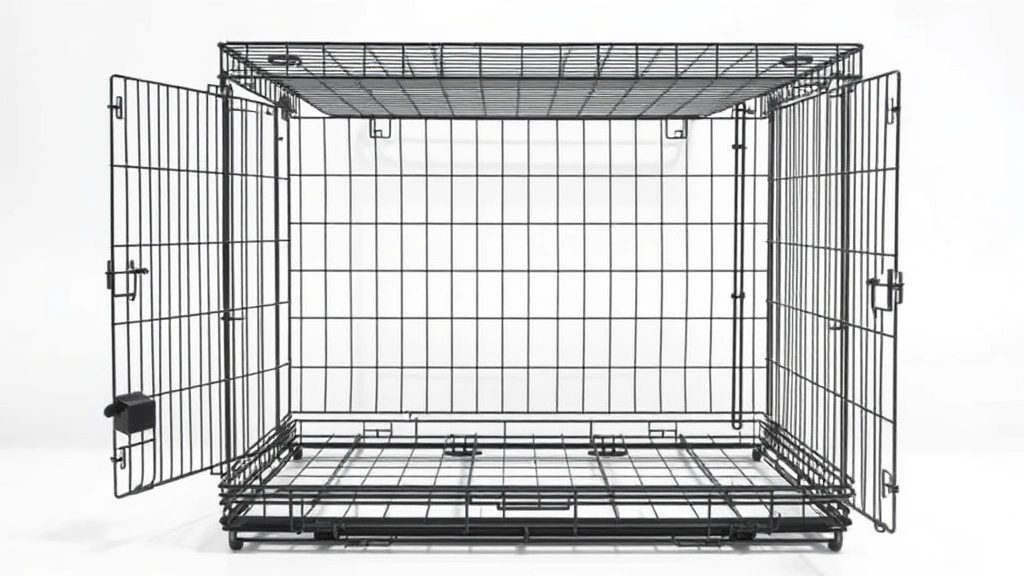
Wire crates are the most common choice among dog owners. They feature a metal frame with wire panels that slide and lock into place. These are incredibly durable and provide excellent ventilation, making them perfect for crate training an adult dog. Wire crates are also the easiest to collapse because of their straightforward design.
Plastic crates, also called airline crates or carriers, are solid-sided and often come in two pieces—a top and bottom. These are ideal for travel since they’re more enclosed and secure. They’re particularly useful when you need to add extra security with a harness on your dog for transport safety.
Fabric crates or pop-up pens are the lightweight champions of the crate world. They’re made with a flexible frame and fabric sides, making them incredibly portable. These are perfect for temporary setups or travel situations where space is at a premium.
Check your crate’s instruction manual or look for any manufacturer labels to confirm which type you have. Most crates will have a brand name and model number printed somewhere on the frame.
Collapsing Wire Dog Crates
Wire crates are the bread and butter of the dog world, and fortunately, they’re also the easiest to collapse. Here’s the step-by-step process:
Step 1: Remove Your Dog and Contents
First things first—make sure your pup is safely out of the crate. Remove any bedding, toys, food bowls, or other items inside. This gives you clear access to all the mechanisms and prevents anything from getting pinched or damaged.
Step 2: Open All Doors
Open the crate’s front door completely. If your crate has a top door, open that as well. Some wire crates also have side doors, so open those too. Leaving any door locked or partially closed can prevent the crate from collapsing properly.
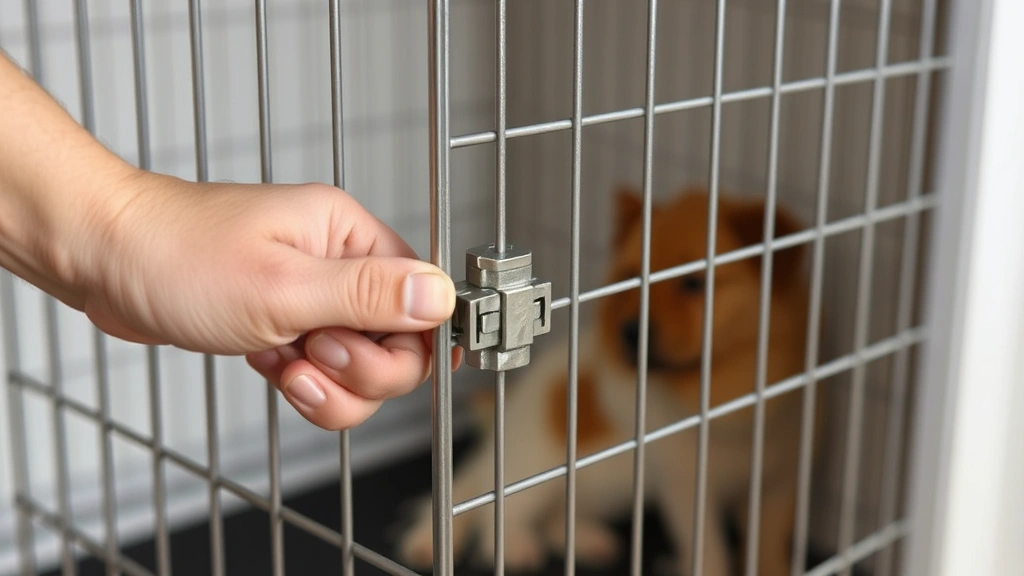
Step 3: Locate the Locking Pins or Levers
Most wire crates have locking pins or levers on each side panel. These typically sit at the top and bottom of the frame where the side panels meet the front and back. Look for small metal pins or plastic levers—these are your key to success.
Step 4: Release the Side Panels
Starting with one side panel, gently lift it upward while simultaneously pulling the locking pins or flipping the levers outward. You may need to apply slight upward pressure on the panel as you release the pins. Do this slowly and deliberately—rushing can cause the panel to snap back or pinch your fingers.
Step 5: Fold the Side Panels Down
Once the locking mechanism is released, the side panel should fold down flat against the bottom of the crate. Repeat this process on the other side. You should now have two side panels lying flat.
Step 6: Collapse the Top and Bottom
With the sides down, the top and bottom panels should fold together naturally. Gently push the top down toward the bottom until they’re completely flat. Some wire crates may have additional latches on the top that need to be released first.
Step 7: Secure the Collapsed Crate
Many wire crates come with a carrying handle or strap that will hold the collapsed unit together. If yours does, fasten this securely. If not, you may want to use a bungee cord or velcro strap to keep everything compact during storage or transport.
Pro tip: If you’re having trouble with stubborn pins or levers, a little silicone lubricant spray can help them move more smoothly. Just avoid getting lubricant on your dog’s paws or anywhere they might chew.
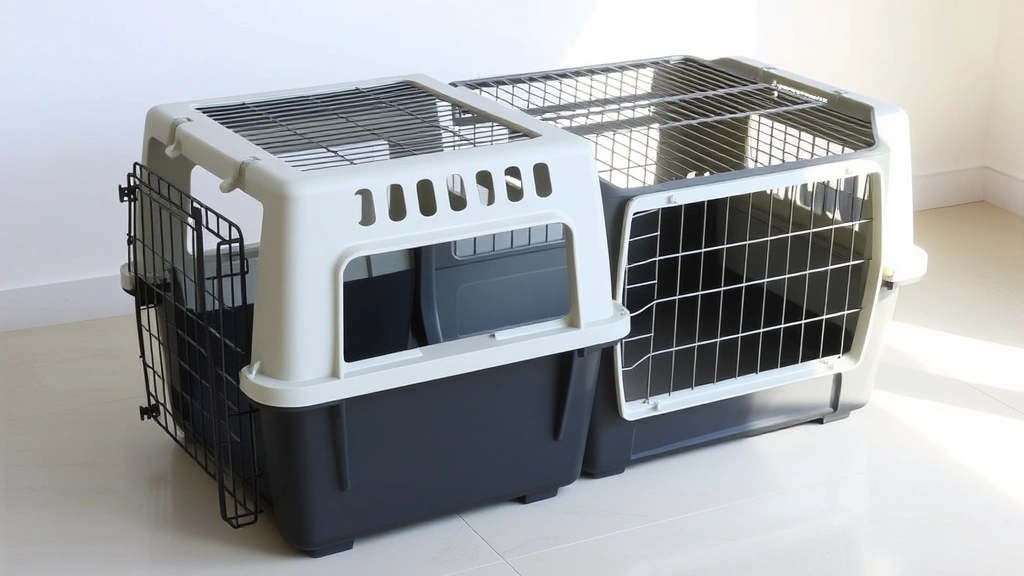
Collapsing Plastic Dog Crates
Plastic crates have a different design than wire crates, which means the collapsing process is slightly different. However, it’s still quite straightforward:
Step 1: Empty and Prepare
Remove your dog and all contents from the crate. Clean out any debris or bedding materials. Plastic crates can trap moisture, so make sure the interior is completely dry before collapsing.
Step 2: Locate the Hinges and Fasteners
Most plastic crates consist of a top and bottom section held together by hinges on one side and latches on the other sides. Examine all the edges to identify where these connection points are located.
Step 3: Release the Latches
Starting with one side, gently press or flip the plastic latches that hold the top and bottom together. These typically require a small amount of force but shouldn’t require excessive pressure. If you meet resistance, check to make sure you’re not missing a latch.
Step 4: Separate Top and Bottom
Once all latches are released, carefully lift the top portion away from the bottom portion. Be gentle, as plastic can crack if handled roughly. Set the top aside in a safe location.
Step 5: Inspect the Hinges
Look at the hinged side. Some plastic crates have hinges that fold completely flat, while others may need to be manually positioned. Check your manufacturer’s instructions for specific guidance on your model.
Step 6: Stack and Secure
Once separated, you can stack the top and bottom pieces together if space is limited. Secure them with a strap or bungee cord to prevent them from shifting during storage or transport.
Important note: Plastic crates are more prone to cracking than wire crates, especially in cold weather. Store them in a temperature-controlled environment and avoid stacking heavy items on top of them.
Collapsing Fabric Dog Crates
Fabric crates are the minimalists of the crate world. Their collapsing process is refreshingly simple:
Step 1: Remove All Items
Take your dog out and remove all bedding, toys, and accessories. Make sure the interior is completely empty before proceeding.
Step 2: Locate the Frame Connectors
Fabric crates are built around a flexible frame system. Look for where the frame pieces connect—these are typically at the corners and joints. Many fabric crates have connectors that simply pop in and out.
Step 3: Disconnect the Frame Pieces
Starting at the top corners, gently pull the frame pieces apart. They should separate fairly easily—if they don’t, you might be pulling in the wrong direction. Take your time and don’t force anything.
Step 4: Fold the Fabric
Once the frame is disconnected, the fabric should collapse naturally. Gently fold it into a compact bundle. Some fabric crates come with a carrying bag that makes storage even easier.
Step 5: Store Compactly
Fabric crates are incredibly space-efficient when collapsed. You can store them in closets, under beds, or in car trunks without taking up much room at all.
Fabric crates are perfect for situations where you need to set up temporary spaces for your dog. If you’re working on introducing a dog to a cat, having a collapsible fabric crate can provide a safe space for either pet when needed.
Storage and Maintenance Tips
Once your crate is collapsed, proper storage is key to ensuring it stays in good condition for years to come. Here are some best practices:
Choose the Right Location
Store your collapsed crate in a cool, dry place. Avoid areas with extreme temperature fluctuations, as these can damage both wire and plastic materials. Basements can work, but ensure they’re not prone to moisture or flooding.
Protect from Pests
Store your crate away from areas where rodents or insects might nest. A sealed storage container or a closet with a door is ideal. This is especially important for fabric crates, which can be damaged by pests.
Keep Away from Chemicals
Don’t store your crate near cleaning supplies, pesticides, or other chemicals. These can leave residues that might be harmful to your dog when you set the crate up again.
Use a Protective Cover
Consider covering your collapsed crate with a sheet or storage bag to keep dust from accumulating. This is particularly important if you plan to store it for extended periods.
Document Assembly Instructions
Keep your original instruction manual or take photos of the assembly process. This will make reassembly much easier when you need to set up the crate again. As part of your overall care for a dog, having these resources organized is incredibly helpful.
Regular Inspection
Before storing your crate for the season, inspect it for damage. Look for bent wires, cracked plastic, or torn fabric. Making repairs now prevents small issues from becoming big problems later.
Label and Organize
If you have multiple crates or pet supplies, label your collapsed crate clearly. This saves time when you’re looking for a specific size or type.
Troubleshooting Common Issues
Sometimes collapsing a dog crate doesn’t go as smoothly as planned. Here are solutions to common problems:
Stuck Pins or Levers
If your wire crate’s pins or levers won’t budge, try applying a small amount of silicone lubricant to the mechanism. Let it sit for a minute, then try again. Never use WD-40 or similar products, as these can be toxic if your dog ingests them.
Plastic Latches Won’t Release
Plastic latches can become brittle or misaligned over time. If a latch won’t release, check that the crate isn’t warped. If it is, you may need to gently bend it back into shape. If the latch is cracked, you might need to replace that component or the entire crate.
Fabric Frame Won’t Separate
Sometimes fabric crate frames can become stuck due to dirt or debris in the connectors. Clean the connector points with a dry cloth and try again. If this doesn’t work, the connector may be damaged and need replacement.
Crate Won’t Stay Collapsed
If your crate keeps popping back open, make sure you’re using a proper strap or bungee cord to keep it secured. This prevents the crate from accidentally expanding and potentially injuring you or damaging your storage area.
Difficulty Remembering Assembly Order
Take a video on your phone while collapsing your crate the first time. Then, when you need to set it up again, you can simply play the video in reverse to remember the order of assembly.
If you’re dealing with behavioral issues that make crate setup stressful, understanding proper discipline techniques can help. A well-trained dog is much more cooperative when it’s time to use the crate.
Additionally, if your dog struggles with crate anxiety, learning about keeping your dog off the couch can help you create appropriate alternative spaces for your pup.
Frequently Asked Questions
How long does it take to collapse a dog crate?
Most dog crates can be collapsed in 2-5 minutes once you’re familiar with the process. Wire crates are typically the fastest, while plastic crates may take a bit longer due to the need to separate top and bottom sections.
Can I collapse a dog crate with my dog inside?
Absolutely not. Always remove your dog from the crate before attempting to collapse it. Not only is this safer for your pup, but it also gives you full access to all the mechanisms and prevents your dog from becoming stressed or injured.
Will collapsing my dog crate damage it?
No, collapsing your crate won’t damage it when done properly. Dog crates are specifically designed to be collapsible. However, rough handling or forcing stuck mechanisms can cause damage, so always use gentle, deliberate movements.
What’s the best way to transport a collapsed dog crate?
Secure your collapsed crate with a bungee cord or strap to keep it compact. If you’re transporting it in a vehicle, place it in the trunk or secure it to prevent sliding. For air travel, check airline regulations regarding crate dimensions and materials.
How often should I collapse and reassemble my dog crate?
There’s no specific timeframe—collapse your crate whenever you need to store it or transport it. Regular collapsing and reassembling won’t harm your crate, but it’s good to inspect it each time for any signs of wear or damage.
Are collapsible crates as safe as non-collapsible ones?
Yes, collapsible crates meet the same safety standards as permanent crates. The collapsing mechanism doesn’t compromise structural integrity when assembled properly. In fact, many airline-approved crates are collapsible plastic models.
What should I do if my crate won’t collapse?
Check that your dog is completely removed from the crate and that all doors are fully open. Inspect for any obstructions or damage to the locking mechanisms. If you still can’t collapse it, consult the manufacturer’s instructions or contact their customer service.
Can I leave my crate collapsed for extended periods?
Yes, you can safely store a collapsed crate for months or even years. Just ensure it’s stored in a dry, temperature-controlled environment away from pests and chemicals.
Is it normal for crate mechanisms to feel stiff?
New crates may have stiff mechanisms that loosen with use. However, if your crate suddenly becomes difficult to collapse after years of use, the mechanisms may be corroded or damaged. Apply a silicone lubricant and try again.
Do all dog crates collapse the same way?
No, different brands and types have slightly different mechanisms. Always consult your specific crate’s instruction manual for the most accurate guidance. When in doubt, gentle experimentation with the locking mechanisms will help you figure out the correct sequence.