How to Draw a Cute Dog: Step-by-Step Guide
Whether you’re an aspiring artist, a dog lover looking for a creative outlet, or someone wanting to create personalized gifts for fellow canine enthusiasts, learning how to draw a cute dog is an incredibly rewarding skill. There’s something magical about bringing a charming puppy to life on paper, capturing those endearing expressions and proportions that make dogs so irresistible. The good news? You don’t need to be a professional artist to create adorable dog drawings that will make people smile.
In this comprehensive guide, we’ll walk you through every step of the process, from basic shapes to adding those finishing touches that give your dog personality and charm. Whether you prefer a realistic style or a more cartoonish approach, these techniques will help you develop your own unique artistic voice. We’ll cover everything from understanding canine anatomy to mastering facial features and expressions that capture the essence of what makes dogs so lovable.
Drawing cute dogs combines fundamental art principles with an understanding of what makes these animals so appealing to us. By breaking down the process into manageable steps, you’ll discover that creating an adorable dog drawing is easier than you might think. Let’s get started on your artistic journey!
Materials You’ll Need
Before you begin your cute dog drawing journey, let’s gather the essential materials. You don’t need expensive supplies to create beautiful artwork—in fact, many professional artists started with basic tools. The key is having quality materials that feel good in your hand and respond well to your artistic vision.
Start with a good selection of pencils. For drawing cute dogs, you’ll want graphite pencils in various grades: an HB for general sketching, 2B for darker lines, and 4B or 6B for deep shadows and contrast. A mechanical pencil with 0.5mm or 0.7mm lead is excellent for fine details. Erasers are just as important as pencils—invest in a kneaded eraser that you can shape to erase small areas precisely, and keep a regular eraser for larger corrections.
Paper quality matters significantly. Choose smooth drawing paper or sketch paper with a weight of at least 90gsm to prevent tears and allow for layering. A blending stump or tortillon will help you create smooth transitions between tones. You’ll also want a ruler for basic proportional guides, a sharpener to keep your pencils pointed, and a paper towel or soft cloth for blending and cleanup.
If you’re interested in adding color to your cute dog drawings, colored pencils, markers, or watercolors can bring your artwork to life. Many artists find that understanding different dog breeds through visual recognition helps them draw more distinctive and accurate characters.
Starting with Basic Shapes
The foundation of any good drawing is understanding basic geometric shapes. Before you worry about making your dog look cute, master the art of constructing it from circles, ovals, and triangles. This approach, used by professional animators and character designers, breaks down complex forms into simple, manageable components.
Begin by drawing a large circle for the head and a slightly larger oval for the body. These two shapes form the core structure of your dog. Don’t worry about making them perfect—slight irregularities actually add character. Next, add smaller circles where the joints will be: four small circles for the legs and a small oval for the tail base. These circles act as anchors for your limbs, ensuring proper proportions and movement.
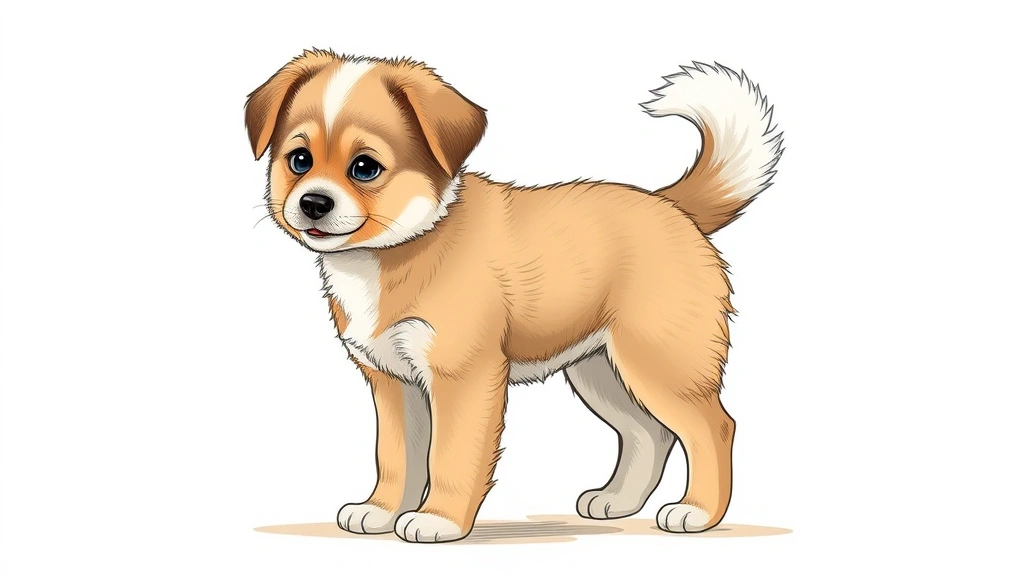
For a cute dog drawing, proportions are everything. The head should be roughly one-third the size of the body, creating that adorable, youthful appearance. The legs should be sturdy but not too long—shorter legs often read as cuter to our brains. Position the front legs closer together than the back legs to create a natural, balanced stance.
Once you’re comfortable with this basic structure, experiment with different poses. A sitting dog has the body angled differently than a standing or lying-down dog. Try drawing your dog from various angles: three-quarter view (which is the most flattering), side profile, and even head-on. Understanding different dog types and their characteristics can inspire your shape variations.
Head Construction and Proportions
The head is where your dog’s personality shines through, so let’s pay special attention to getting this right. Start with your basic circle, then divide it into quarters using a vertical and horizontal line. These guidelines will help you place facial features symmetrically.
For a cute dog, the muzzle should be proportionally shorter than a realistic dog’s muzzle. Draw a small oval or rectangle protruding from the lower part of the circle—this is your snout. The muzzle should be about one-third the width of the head circle. Add a smaller oval inside for the mouth area.
Next, add the ears. Cute dogs often have larger, more prominent ears than realistic proportions would suggest. Position them on the sides of the head, either standing upright for alert breeds or hanging down for floppy-eared varieties. Experiment with ear shapes: pointed triangles for alert dogs, rounded shapes for softer appearances, or long ovals for droopy ears.
The eyes deserve special attention in cute dog drawings. Place them on either side of the vertical guideline, positioned in the upper half of the head circle. Space them appropriately—eyes that are too close together look strange, while eyes that are too far apart lack cohesion. Leave a small gap between them for the bridge of the nose. Understanding why dogs respond to certain touches and affections can help you draw expressions that convey those emotions.
Drawing Facial Features
Now that you have the head structure established, it’s time to bring your cute dog to life with detailed facial features. The eyes are the window to the soul, and in cute dog drawings, they’re often exaggerated for maximum appeal.
Eyes: Draw two almond-shaped or circular eyes, leaving a small highlight area white—this creates that sparkly, alive appearance. The pupil should be large and dark, positioned toward the center or slightly down. For maximum cuteness, place the highlight in the upper portion of the eye. Add a small curved line above each eye for eyebrows, which dramatically change the dog’s expression. Eyebrows angled upward create a sad or pleading look, while straight eyebrows convey alertness.
Nose: The nose is typically a small triangle, circle, or oval positioned at the tip of the muzzle. In cute drawings, keep it simple and expressive. A small black triangle works wonderfully. Add a tiny dot or line below the nose to indicate the mouth opening.
Mouth: For a cute expression, try a simple curved line for a smile, or a small open mouth showing a tiny tongue. The mouth should be small relative to the head—avoid making it too large or it will overwhelm the face. A gentle curve upward creates that friendly, happy appearance.
Explore how dogs perceive affection and physical contact to inform your expression choices. A dog receiving affection might have its mouth slightly open in a smile or eyes partially closed in contentment.
Tongue: A tiny pink tongue peeking out adds tremendous charm. Draw a small rounded shape just below the mouth line. This single element can transform your drawing from neutral to absolutely adorable.
Body Structure and Anatomy
With your head complete, it’s time to develop the body. This is where understanding basic canine anatomy becomes invaluable, even for stylized cute drawings.
Your dog’s body should flow naturally from the head. The neck should be relatively short for cute proportions, connecting smoothly to the shoulders. Draw the front legs with slightly bent joints—straight, stiff legs look unnatural. The back legs should be slightly longer and positioned to suggest weight distribution. If your dog is sitting, the back legs fold beneath the body.
For a standing dog, the legs should be positioned so the body weight appears balanced. The front legs are typically closer together, while the back legs are slightly spread for stability. Add joints at the elbows and knees with small curves to indicate where the bones bend.
The tail is an expressive element. A tail curving upward suggests happiness and energy, while a tail hanging down conveys sadness or submission. Try drawing the tail in different positions to see how it affects the overall mood. Even the tiniest dog breeds have expressive tails that add character to your drawing.
Add paws at the end of each leg. These can be simple rounded shapes or more detailed with visible toes. For cute drawings, slightly oversized paws add to the endearing quality. Add small curves or lines to suggest toes and paw pads.
Adding Details and Texture
Now that your basic dog structure is complete, it’s time to add the details that transform a simple drawing into a polished piece of artwork. These finishing touches are what make the difference between a good drawing and a great one.
Fur and Texture: The way you render fur dramatically affects your drawing’s appeal. Use short, directional pencil strokes that follow the contours of the body. Fur should flow in the direction it naturally grows—downward on the sides, upward on the legs, and outward from the body. Vary your stroke length and pressure to create visual interest. Some areas should have denser shading to suggest shadow and dimension.
Facial Details: Add wrinkles or creases where the muzzle meets the face, around the eyes, and on the forehead. These subtle details add character and make your dog feel more alive. Small lines radiating from the eyes suggest age or expression. A vertical line down the center of the muzzle can define the separation between the two halves of the snout.
Ear Details: Inside the ears, add curved lines to show the inner ear structure. Shade the inner ear slightly darker to create depth. If your dog has floppy ears, add subtle wrinkles or folds where the ear bends.
Consider how dogs respond to physical affection and touch when deciding on body posture and detail placement. A dog in a relaxed, happy position shows contentment through its entire body structure, which your details should reflect.
Capturing Cute Expressions
Expression is everything when drawing a cute dog. The same basic structure can convey completely different emotions based on subtle changes to facial features.
Happy Expression: Eyes should be bright with visible highlights. Eyebrows angle upward slightly at the inner edges. The mouth curves upward in a smile, and maybe a tiny tongue shows. The overall face appears relaxed and open.
Sad Expression: Inner eyebrows angle upward, creating a concerned look. Eyes appear slightly larger and more vulnerable. The mouth is either closed with corners turned down or forms a small frown. This expression often triggers our protective instincts.
Playful Expression: Eyes are wide and bright. The mouth is open in a big smile or pant. The head might be tilted slightly. The overall posture suggests movement and energy, even in a still drawing.
Sleepy Expression: Eyes are half-closed or appear as simple curves. Eyebrows might be relaxed or slightly drooped. The mouth is closed and peaceful. The overall demeanor suggests contentment and relaxation.
To master expressions, study photographs of real dogs in various emotional states. Notice how the entire face changes, not just the mouth. The position of the ears, the shape of the eyes, and even the tilt of the head all contribute to conveying emotion. Reference resources like the American Kennel Club can provide excellent dog photographs across breeds and expressions.
Coloring and Shading Techniques
Once your line work is complete and you’re happy with the drawing, it’s time to add value and color. Proper shading brings your cute dog to three-dimensional life.
Grayscale Shading: Before adding color, master grayscale shading with pencil. Identify your light source—where is the light coming from? Shade the areas away from the light darker, and leave the areas facing the light lighter. Use a blending stump to smooth transitions between light and dark areas. Layer your shading gradually, building darkness slowly rather than applying heavy pressure immediately.
Key areas to shade include the underside of the body, inside the ears, around the eyes (creating depth), and beneath the chin. The transition from light to dark should be gradual and natural, not harsh and abrupt. Use your kneaded eraser to lift highlights—this technique creates realistic fur texture and adds dimension.
Adding Color: If using colored pencils, layer light colors first, then add darker shades on top. Blend colors by layering complementary hues. For a brown dog, try layering yellow, orange, and brown rather than using brown alone. This creates richer, more interesting color.
Watercolor offers a different approach—apply light washes first, allowing them to dry before adding darker details. This prevents muddy colors. Markers are immediate and bold but offer less blending flexibility.
Background Consideration: A background can enhance your drawing significantly. Keep it simple and less detailed than your dog so the subject remains the focal point. Soft colors or gentle gradients work beautifully. The background should complement your dog’s colors without competing for attention.
Professional resources like ASPCA and artistic guides can provide inspiration for realistic dog coloring while maintaining your cute style.
Frequently Asked Questions
What’s the best pencil grade for drawing cute dogs?
For initial sketching, use HB or 2B pencils—they’re soft enough to erase easily but dark enough to see clearly. For shading and adding depth, graduate to 4B, 6B, or even 8B pencils. These softer grades create darker values and blend more smoothly. Always keep a good eraser handy, as cute dog drawings require lots of refinement.
Should I draw from photographs or imagination?
Both approaches have merit! Drawing from photographs helps you understand real proportions, lighting, and anatomy. Imaginative drawing develops your creative skills and personal style. Beginners often benefit from using references, while experienced artists can work from memory. Try combining both—sketch from reference photos, then add your own creative touches and expressions.
How can I make my dog drawing look cuter?
Key cuteness factors include: larger eyes relative to head size, shorter muzzles, rounder overall shapes, bigger ears, and softer expressions. Exaggerate these features beyond realistic proportions. Add a tiny tongue, give the dog a gentle smile, and ensure the eyes have bright highlights. Rounded rather than angular shapes automatically read as cuter to viewers.
What’s the most common mistake beginners make?
The most frequent error is poor eye placement or proportions. Eyes that are too close together, too far apart, or positioned incorrectly can make an otherwise good drawing look wrong. Spend extra time getting the eyes right before moving forward. Also, beginners often make the muzzle too long—shorter muzzles are essential for that cute appearance.
How long does it take to draw a cute dog?
A simple, quick sketch might take 15-30 minutes. A more detailed drawing with shading and color typically takes 1-3 hours. A highly detailed, photorealistic cute dog might require 4+ hours. The time depends on your skill level, the complexity of your design, and whether you’re adding color or keeping it grayscale.
Can I use digital tools to draw cute dogs?
Absolutely! Digital drawing apps like Procreate, Adobe Fresco, and Clip Studio Paint offer excellent tools for creating cute dog drawings. Many of the same principles apply—basic shapes, proportions, and expressions. Digital tools offer advantages like unlimited undos, easy color adjustments, and the ability to create multiple versions quickly. However, the fundamentals remain the same whether you’re drawing on paper or digitally.
How do I improve my cute dog drawings over time?
Practice consistently and draw from various references. Study real dogs and other artists’ interpretations. Keep a sketchbook and draw daily, even if just for short sessions. Join online art communities for feedback and inspiration. Take breaks to avoid burnout, and don’t be discouraged by early attempts—every artist started as a beginner. Watch tutorial videos, read books on animal anatomy, and most importantly, keep drawing!
What if my dog drawing doesn’t look cute?
If your drawing isn’t reading as cute, examine the proportions first. Make the eyes larger, the muzzle shorter, and the overall shapes rounder. Check the expression—are the eyebrows and mouth conveying friendliness? Adjust the highlights in the eyes to make them sparkle. Sometimes small tweaks to the expression completely transform a drawing’s cuteness factor. Don’t erase—instead, make adjustments with additional lines and shading.